
Ace and Steve’s Big Vintage Summer Adventure Concludes
Update No. 5: You Can’t do That*
by Steve Graham
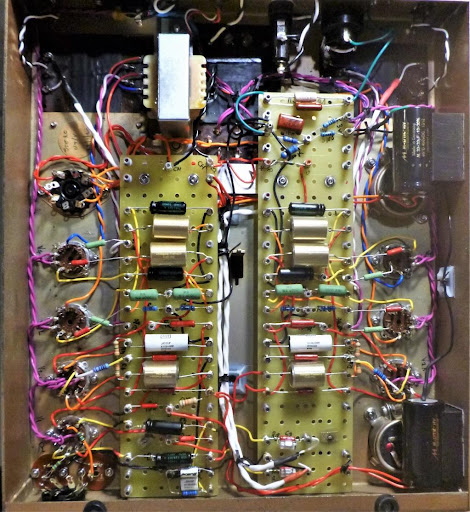
Rewired and running like a new amp. Literally, like a 2022 amplifier.
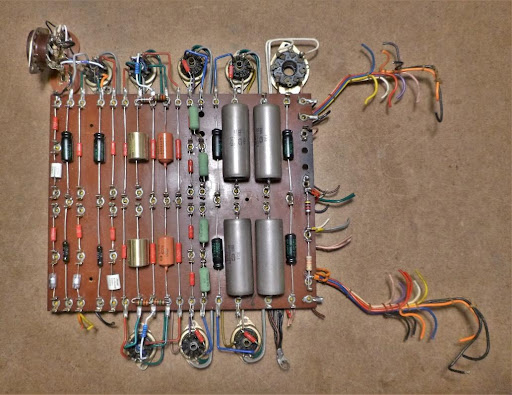
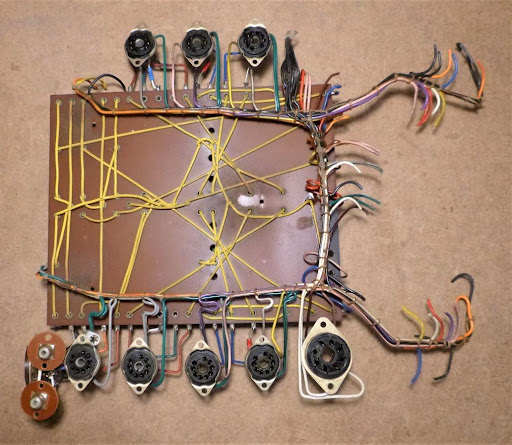
*Except I did. Let me start by ripping the Band-Aid off quickly. I gutted this classic amplifier, before completely rebuilding its under-chassis components. The method of assembly chosen by Leak made it virtually impossible to trouble-shoot the previously reported hum issues. The wiring harness was trapped between the chassis and the component board. The harness was crap too, with all wires bundled together. Filament supplies, high voltage lines and signal-carrying conductors all shared the same real estate. Pairs of wires e.g., filament, weren’t even twisted to reduce interaction with various other circuitry within the amplifier. This wasn’t unique to Leak. The venerable Quad II used a similar style wiring harness. At least the Quad’s harness was easily accessible. Some Quad rebuilders “unpack” the wiring harness for improved sonics. An at first glance haphazard-looking, though correctly connected, wiring job can, in fact, yield better sound. There was also some sort of gooey wax coating the board and wiring. The issue of wax on the eyelet boards in vintage Fender guitar amps is known to cause leakage current problems. This leakage can cause hum and noise issues due to the wax absorbing airborne pollutants.
Those with strong constitutions, who are still with me, should know that I didn’t change the circuit in any significant way. For those interested in a more detailed description of the rebuild, it’s presented after the listening test and summary.
The many hours of work, spent completely rebuilding the circuit, resulted in the Leak being acceptably quiet. There are very small amounts of hum and hiss – source dependent – that can only be heard with an ear very close to the loudspeakers. It’s not as quiet as my SPP EL84 amp, but the Leak has much higher gain, more on this below. What really matters is that the Leak now plays nice with source components connected to its input. Previously the amp was OK on its own but would hum unacceptably when sources were connected.
There was one gotcha moment when I first powered up the rewired Leak. I like to not connect the NFB (negative feed back) when I first power up a new or rebuilt amplifier. If I’ve gotten something backwards, I don’t want a bunch of positive feedback getting out of hand and potentially damaging tubes or other components. When the amp is running OK without NFB, I’ll momentarily make the connection and listen for the audio level to drop to indicate correct NFB configuration. Without NFB the Leak has silly-high gain. The first time I connected NFB the gain didn’t change. I spent half an hour or so poking around checking the wiring, then (head slap) realized I had connected the NFB to a blank turret on the board and not to the correct one(s). Upon connecting the NFB to the correct terminal the gain dropped, a lot. The Leak sure has a lot of NFB. It needs a lot to reign in the very high gain present without NFB.
I judged sound quality employing the same setup used for the Fisher mono amps. Essentially my PS DirectStream DAC directly fed the amps. On the output side my Triangle BR 02s did the loud-speaking. Like the Fisher/SPP comparo test, I swapped out EL84s between the Leak and my SPP (Simple Push Pull) project amp. The core music tracks were the same as the Fisher comparison too.
Surprisingly, considering the very much different circuits, the Leak sounds a fair bit like the rebuilt Fisher amps. Which is to say, quite good indeed. In comparison to my SPP, the Leak is very slightly reticent in the treble range. Both amps have good detail in the highs but the SPP has a very slight advantage. Through the midrange, it’s advantage Leak. Voices, pianos and acoustic stringed instruments seem to have marginally more warmth, weight and for lack of a better word, glow. The SPP and Leak seem fairly evenly matched in the bass. Larger, full range, efficient speakers might reveal more differences in this regard than my small Triangles.
It’s a good sign, in my estimation, that I had to force myself to stop enjoying the music and concentrate on the various aspects of the sound. Considering where this Stereo 20 started from and the work involved, I consider its audio performance eminently musical and the rebuild an unqualified success. The flip side of this is the performance of modern EL84 amps. Those who yearn for a classic amp and its sound, but can’t afford the price of admission and the potential rebuild costs, needn’t deny themselves. Shop carefully for a new EL84 amp and just enjoy the music.
Summary
This “adventure” took a much different course than I thought it would. What the editor and I had in mind was another chapter or two in the CHE (Classic, Heritage, Exotic) series. To say that the route from near-antique curiosities to functioning amplifiers was circuitous, would be an understatement. Thoughts of CHE components were secondary when I was mired in the quicksand of amplifier rescue.
The Mactone preamp might be an Exotic but it looks a bit too mainstream, circa 1990 or so.
The Fishers are just too utilitarian looking, some might even say butt ugly, though they might be considered classics due to their name.
The Leak mystique likely qualifies it for Heritage status.
My changes to the Fisher and Leak amps would, in the minds of many I’m sure, disqualify them from classic or heritage status. So be it. Used within their power limits and with sympathetic partnering components, the Fishers and the Leak make enjoyable music. That’s the important thing to me. Whether or not they are true to their original sound of sixty or more years ago, matters not, as far as I’m concerned.
If, when the Fishers and Leak were built, their respective manufacturers had access to the more stable resistors and the much better capacitors we almost take for granted today, I think they would likely have used them. My modifications to the Fishers and Leak in this series make them now, with regards to their performance, almost modern tube amps. I make no apologies for upping their games.
Except for my wife’s birthday and our wedding anniversary, I am not a sentimental person. That’s why I have little hesitation correcting and improving audio components of yore. If you don’t agree, that’s fine. I’m not trying to change anyone’s point of view. I mostly look to the past in my choice of music, but I look ahead for the reproduction of it.
Ace and I both acknowledged that the Fishers, with the circuit changes I made and their new Hammond output transformers, aren’t really Fishers now. Fishmonds or Hammers perhaps?
We are both a bit ambivalent about the Mactone preamp. The line stage section is a heavy hitter that can compete with new amps costing big bucks, according to Noam. This makes the decent but workmanlike phono section seem slightly disappointing. With my ministrations the Mac is safer and won’t eat its tubes. I’d hoped to hit it out of the park with the Mactone but I’ll settle for a stand-up double.
The Leak, with my rewiring, is not a pristine, untouched Stereo 20. If it were a person, the Leak would be eligible for a pension in less than three years. The fact that its sound competes, modern parts assisting, with the sonics of modern EL84 amps is a testament to the efficacy of the original circuit and the design and construction of the output transformers.
Leak Rebuild Details
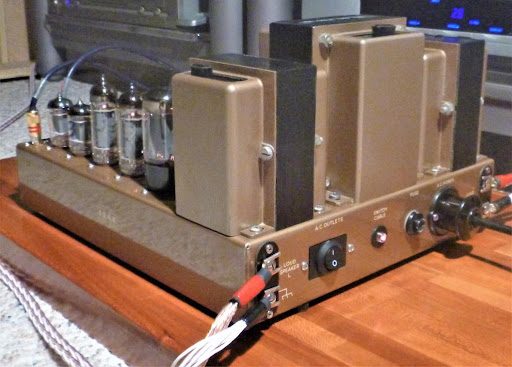
All of the Leak’s tube sockets were well worn. I replaced them with some lightly-used sockets of British and USA manufacture from the 1960s. Twisted pairs of filament wires were run in the chassis corners, as is current practice for non-PCB wiring. As well, I cleaned up the circuit grounds and chassis grounding scheme. This necessitated a few more components but these were easily accommodated on one of the new turret boards. Cleaning up the grounding and separating the filament wiring from other conductors was the likely remedy to the hum issues. With some fixes you never really know why. It’s down to good practice and dumb luck at times.
Also implemented was a simple circuit used to float the filament supply above circuit ground by tying it to a portion of the B plus supply. (See the SPP schematic in part 4 of this series for details.) This is commonly employed in contemporary amplifiers to reduce hum in the output and put less stress on the input and phase splitter tubes. In general, the layout of the turret boards is similar to the single original ladder board. Screen grid current limiting resistors were added, a common practice today and not unheard of when the Leak was new. The EL84 cathode resistors were changed from the stock value (300 ohms versus the original 270 ohms) to lower current draw and extend tube life.
When I received the Leak, Ace had already replaced about two-thirds of the capacitors and resistors. Already installed were two Obbligato film caps and six NOS paper-in-oil (PIO) caps, used for signal coupling. The Fisher amps performed much better with Obbligatos than they did with PIOs. The six remaining PIOs were changed to Obbligatos (gold-coloured components in the photo) or other quality film caps.
The original ladder board was partially scorched in the area of a high-wattage power supply resistor. I decided to replace the resistor with a filter choke, as this had been beneficial for hum reduction in the SPP and Fisher amps.
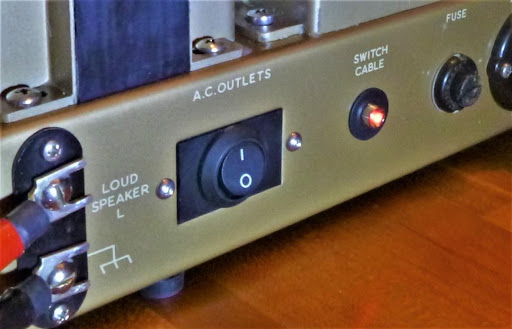
The AC supplying the Leak was originally meant to be switched by its accompanying preamp. Many Leaks have been converted with the addition of a switch on the Stereo 20 chassis. As received, there was a switch installed. It looked rather fragile and the lamp in it to indicate power on was dim. With a bespoke grommet and bezel, I put a LED in the switch location. The auxiliary AC outlets, beside being only 2-prong and unsafe, were cracked. I replaced the outlets with a low-profile AC switch mounted in a custom-machined Delrin block.
Leak used a real fugly method to attach the tube sockets and other components to the top of the chassis. They drove self tapping screws from the inside which resulted in blunt screw-ends protruding from the chassis top. That sort of cosmetic faux pax might have cut it in 1960 but my OCD nature wouldn’t accept it in 2022. I drilled out all of the holes and attached tube sockets, input jacks and other components with button head, stainless steel screws.
Postscript: I have decided to not make a career of amplifier rehab. If anyone would like guidance, I will be more than happy to advise where I can. That’s not to say that the process with the Mac, Fishers and Leak wasn’t enjoyable. It was engaging and rewarding. Though I have to admit, there was more than a little anxiety concerning the Leak’s outcome, considering the scale of the rebuild.
Winter 2022/23 will, I hope, see me return to a few DIY amp projects of my own that have been awaiting my attention. One is an homage to the late Tim de Paravicini of EAR. The second is an offbeat Japanese push-pull design using 6L6 tubes, the small block Chevy of the power tube world, in my estimation. Do your neglected projects glower at you in mute accusation? Mine sure seem to. Anyway, both of my amplifier projects are too far into the weeds to be future Wall of Sound material, but might see use in future speaker reviews.
Steve,
I have been waiting for this final chapter in the saga. Lovely rebuild. Your comments on the sound of the Leak mirror my recollection of the main reasons I loved mine until it expired. Well done. Any sixty year old amp needs a complete rebuild. Enjoy the results.
Cheers,
David Neice
Too bad you’re not taking on any work.I’ve got an old Bell 2418 that is stock, except for the tubes(6V6x4).It is working and sounding quite good!I bet a thorough update like you did to the Leaks would make this a contender.
Mr. Lee,
Thank you for your interest in Wall of Sound and taking the time to comment. Reminds me of the line in an old movie, “I coulda been a contender.” Sorry, back to the matter at hand.
With enough work almost any old amp from the golden age of HiFi can sound at least very pleasant. In my experience, the thing holding back most of these old amps are the output transformers. Ace got lucky in that the trannies in his Leak were both still functional and very good transformers to start with.
Other than new tubes possibly, all old amps need new filter capacitors, likely coupling capacitors and quite probably replacement of some carbon composition resistors that have drifted in value.
If you can do this work yourself, almost any working amp is worth the effort. Did you read how I got burned with Ace’s Fisher amps?
If you have to pay someone else to do the work, then you should probably be a bit more circumspect. The final result might not justify the outlay.
For true classics like a H-K Citation, Leak, Quad II, ARC or similar, the expenditure would be easier to justify.
In the interest of safety, if you have not already done so, I would recommend that you replace the power cord with a 3 conductor, 3 prong item and remove the “death cap”. See my Fisher article for info on the death cap.
Happy listening.
Regards, Steve Graham