
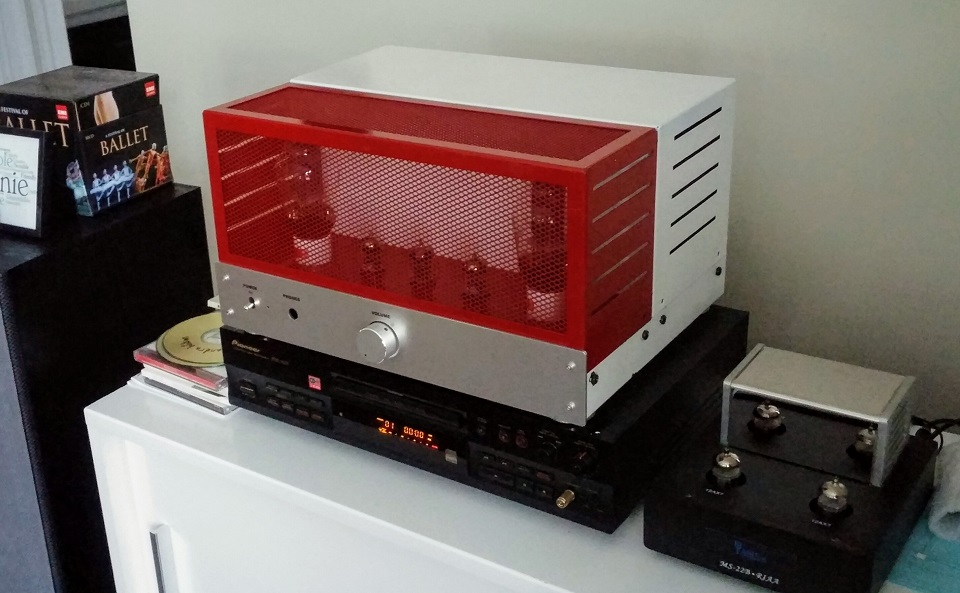
In Part 1 of this series, I covered (mainly) the Elekit TU-8600’s performance. That amp came to me fully assembled, as a “Rev.2 prototype”. And in my mind, I’d thought (hoped?) that I’d be able to buy and keep that amp. That didn’t happen. Elekit/VK needed it back, and Victor sent me a brand new kit. So I ended up starting where everyone else would start. Time to fire up the old soldering iron!
What I’ll cover in this part will be the build process, and the upgrade to the Lundahl output transformers.
Building the Kit
 How did it go? Overall, I had a pretty smooth experience. There are aspects of this amp kit that are more complex than the TU-8500 preamp, which I built last year – but the preamp had more PCB’s, and tighter spacing overall. So I think going into this amp build, I was feeling “confident” I’d have an eas(ier) time with the 8600, and it turned out to be a little more challenging than I expected. But wherever I encountered a problem, the problem was me. I may not be the world’s worst DIY’er, but I might be the most impatient!
First off, the kit arrived with everything nicely bundled and the parts sorted and arranged into their own bags. Very tidy and professional – no surprise, this is Elekit. The 32-page manual deserves special mention. This is likely the best audio documentation I’ve ever seen. Novice builders especially should take note: look at the little icons on the PCB, look at the drawings in the manual – look for clues. If something seems complex, you’re not looking. They’ve done everything you could think of (and more) to make each step as simple and clear as it can be. There should be any confusion. Just take your time, enjoy each step and try not to race ahead.
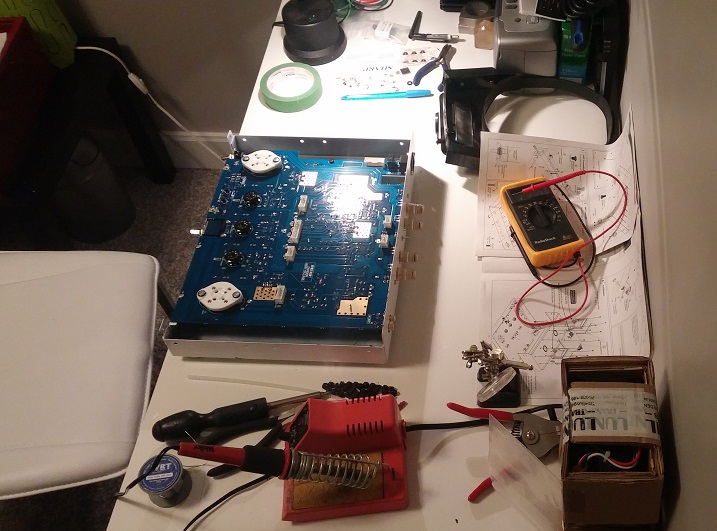
You can count all the parts if you like, but the people who package these kits are fanatically attentive to detail, and the chances of encountering a miss are very low. I just started stuffing. My technique was to stuff the board with a full set of parts (resistors, diodes, etc) and then solder that set before starting on the next set. Actually with the resistors you might want to solder some as you go, because there are so many. You just follow along in the order the instructions are written. They don’t always tell you exactly when to solder, but you soon pick up on what’s happening. You don’t want to stuff the entire board, flip it over to start soldering, and have a dozen parts fall out. So keep soldering as you work through it.
The PCB is very well laid out and clear, and in general, there’s enough room to make soldering easy (there are a few tight spaces, but thankfully not too many). “Take your time” is the best advice I can give here. Another general comment: the bigger the part, the more careful you need to be. A part with three pins is a lot more difficult to desolder than a resistor or cap with two legs. The bigger parts become anchored in, and removing them can be a bit of a nightmare.

I made a couple such blunders. I soldered a seven pin connector into the eight pin position. Bad. Desoldering a part like this involves some brute force, and the part isn’t likely to survive. Of course, the part itself is easy enough to replace. You want to be more careful (while desoldering) not to damage the board itself..a ruined board spells a horrendous amount of rework! Please take your time: as you get deeper into the build you will naturally want to go faster. That’s the time to go slower.
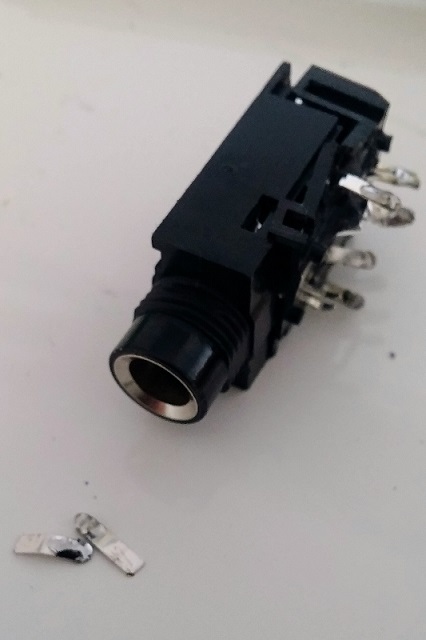 After my replacement connector arrived in the mail (thanks Victor), I finished up the kit – and only then did I notice that the headphone jack wasn’t soldered well. The part wasn’t seated down on the board like it needs to be. ARGH. This means that when you assemble the chassis, the h/p jack isn’t in the right spot where its hole is. Bad. I got it desoldered ok (again with brute force, the part was toast), and finished the build. In hindsight, I should have tried harder to seat the thing. Because unfortunately, the headphone circuit is integral to the amp’s operation: its ‘disengaged position’ allows the electrons to flow to the speaker taps. So, with no connector in place, my amp turned on, the tubes lit up, I could take measurements, but I had no sound – it was as though a pair of headphones were plugged in. Frustrating! Victor said he had an extra Jack and would have it for me at the TAVES show when I saw him there. (thanks Victor)
Wait, and wait some more.
So while waiting…well, I got impatient and decided I’d try to paint the amp, for a more funky look. I suppose memories of the red TU-8300R may have been responsible. I thought a red and white scheme would look nice – it would match the bases of the Genelex Gold Lion tubes, and the colours of the Canadian and Japanese flags. (Wall of Sound, Elekit, Japanada. You know what I mean)
Don’t do this. Just. Please. Don’t.
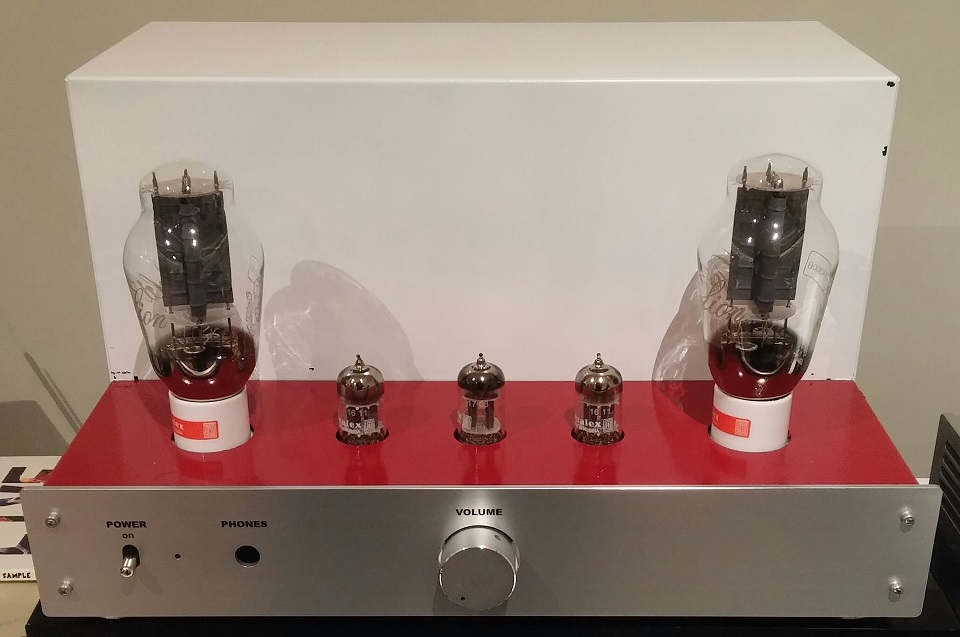 Not unless you know what you’re doing. A metal chassis like this needs the correct preparation before it can be painted. It needs to be cleaned well, with an appropriate solvent, sanded down where appropriate, and primed with the right primer. Even then, there may be issues if you aren’t a pro at applying finishes. I will make a long story short, my ‘test area’ under the bottom chassis seemed to hold up well (sprayed primer and then white sprayed Krylon). But once I sprayed more of the chassis, well, I ran into numerous issues getting the right coverage. In the end, the paint looked ok for a day or two, but started flaking off almost immediately; by the time I had the final part (h/p jack) to complete the amp, I had spent several hours removing the paint. So, my amp is a plain Ellie again, and the colours are a memory preserved in photos. Humbling. I may take the chassis parts to a powder coating place someday and get a nice paint job done. When funds permit. Maybe.
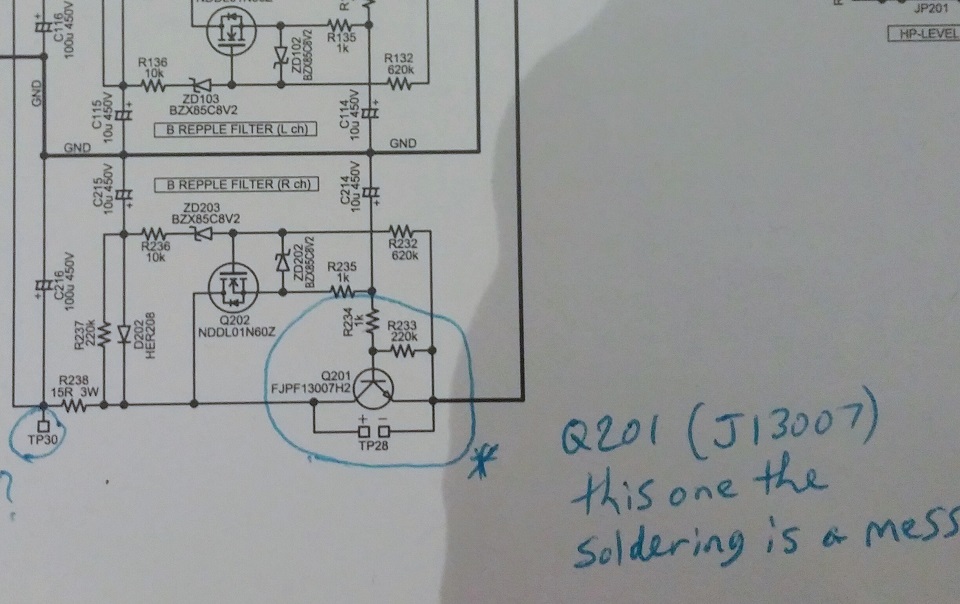
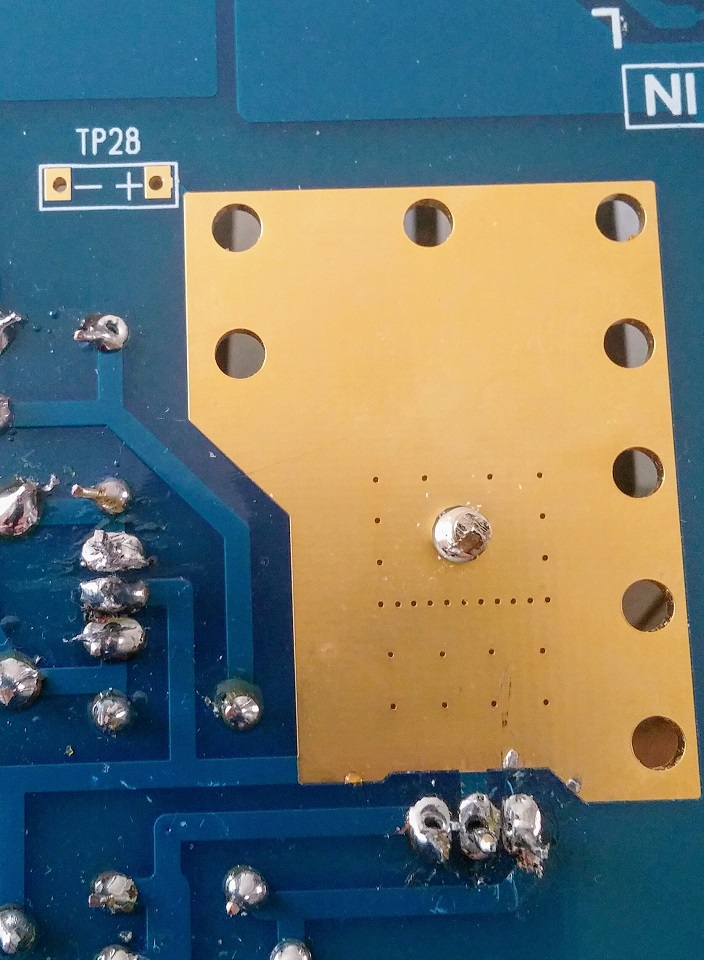
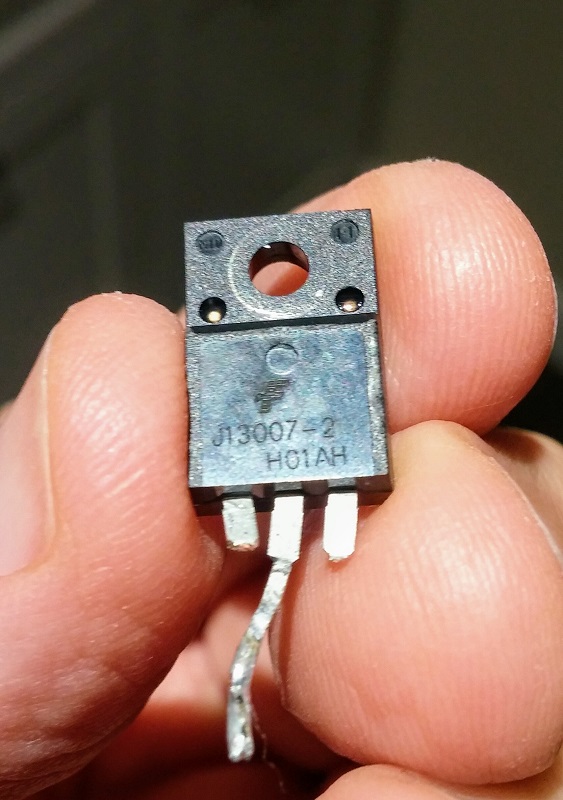
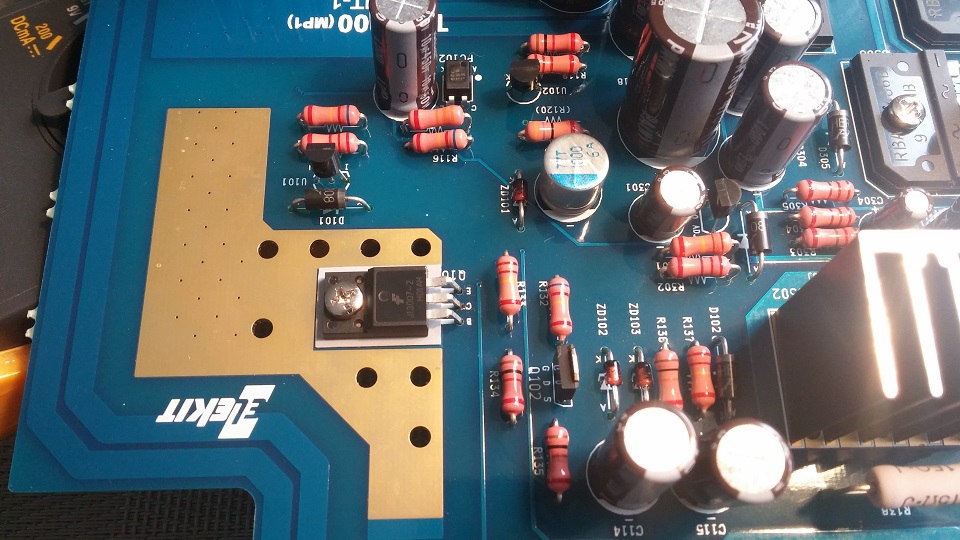
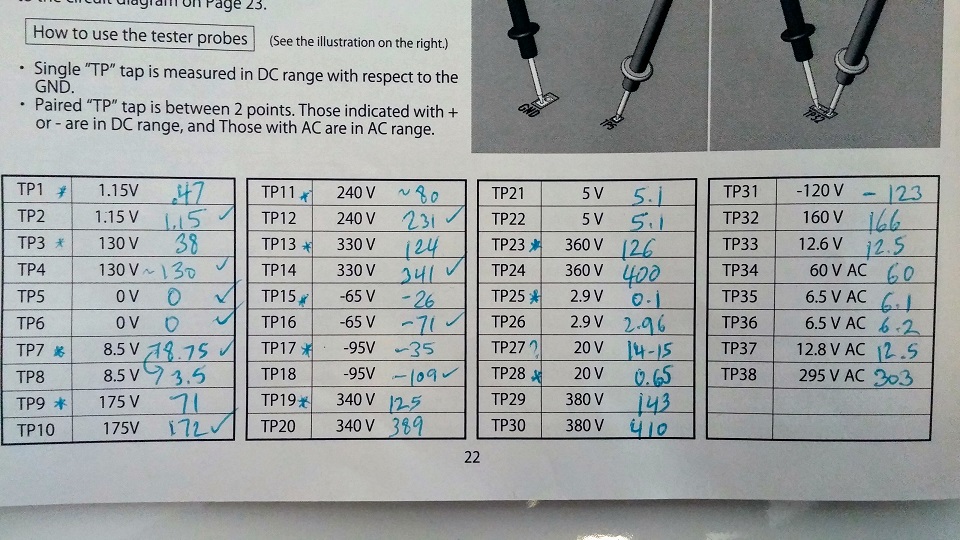 Back to measurements. Initially my readings were a bit of a mess. What you want to do first off, is some careful review (a magnifying glass helps a lot) and touchup of any questionable solder joints. After doing this, I had 37 out of the 38 test points measuring well. However, TP28 was still extremely low, I only had around 0.65V where it should have been 20V. This is the Right channel Ripple Filter circuit – so the result was a hum in the right channel. Victor diagnosed (correctly) that the J13007 transistor was the issue (Q201 position on the board). Removing and resoldering this transistor proved too much, and the part was fried – it then measured 0V. Time for another email to Victor. And more waiting. Victor sent me a new J13007, along with a nearby FET, as well as the new PTC’s that Elekit recommends, since the originals were discovered to be inferior. (thanks Victor)
One correction from what I wrote in Part 1. The headphone gain adjustments are accessible – remove the 300B tubes and the top plate, and you can access the jumpers. I don’t think people will be changing these very often, but if you need to, it’s a fairly quick procedure.
Another thing every builder should do is sand down the chassis to bare metal around the point where the volume pot parts make contact with the chassis. This eliminates any noise related to grounding this part of the circuit.
Et voila! The amp is built, and it sounds fantastic. The build process overall was enjoyable, and of course, it sounds better since I built it myself (grin). Victor gives excellent support – both by email/phone as well as on his forums on Diyaudio and AA. In fact, he had 3 or 4 trade shows almost back to back during this period, and never missed a beat. The man is tireless. There are a few ‘legends’ in the audio DIY business, like Nelson Pass, who continually give and give to the community. I count Victor Kung in that small number who truly deserve our gratitude.
And now….the Lundahl Upgrade
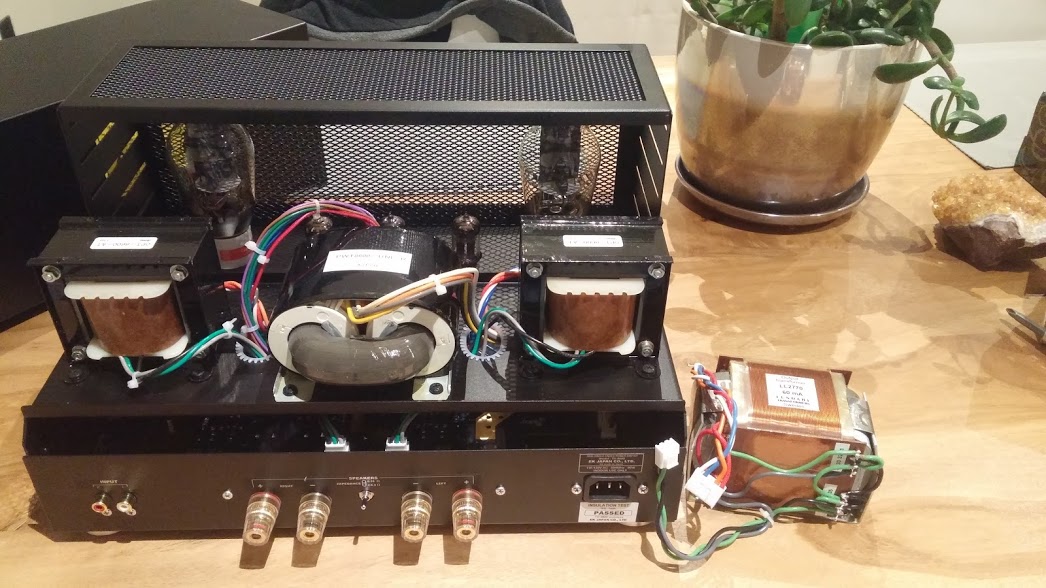
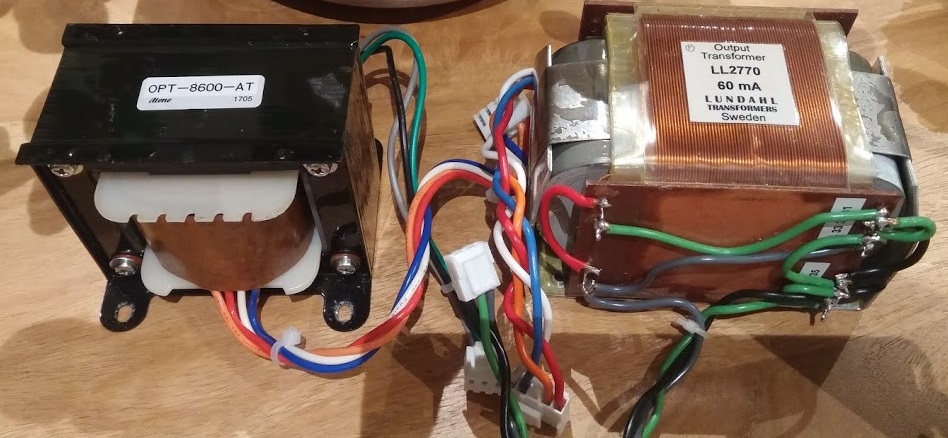
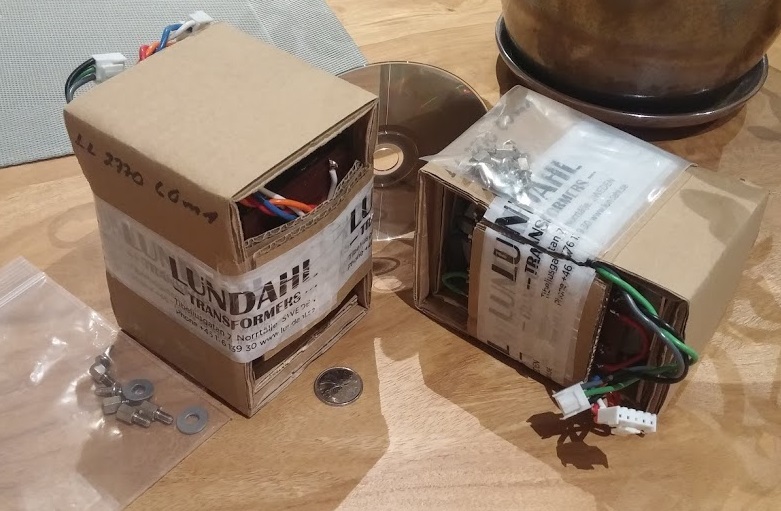 Earlier this year, Victor commissioned Lundahl to make the LL2770 output transformers for the TU8600, as an extra cost upgrade option. My prototype kit arrived with the stock transformers, as well as the Lundahls. I listened to the stock amp for about 4 weeks before switching over. It was hard to wait! But I knew that the chance of wanting to “switch back” was low, and I wanted to give the stock opt’s a fair shake. And to be fair, they are not bad at all. But high end iron is where the bulk of tube amp costs reside, and you can really see that with the Lundahls. You can even feel it when you pick one up, they are close to 6 lbs each according to my bathroom scale. Victor supplies the Lundahls with the parts needed for a seemless installation: bolts, washers, standoffs, as well as custom PCB’s to tidy up the leads and allow the Lundahls to hook up to the Elekit board with the supplied quick connectors.
The photos don’t really do the Lundahls justice. These are big, weighty and robust, they’re beautifully built. They’re designed to extract the last ounce of performance from your 300B SET amp. And I think they do just that.
 For me, there wasn’t a night-and-day difference upon installing the Lundahls. What I heard was a subtle, across the board improvement. The bass was a little tighter; the mids a touch more vivid. The top end sparkle was slightly more refined. Imaging ability was a little sharper. Most of all, the music seemed to have a better flow – where at times it was ponderous, it now seemed faster, and more assured. This was especially noticeable to me with modal and ‘west coast’ jazz listening. With better electron flow, the notes and beats are less confused, the music makes more sense.
Again, this wasn’t a super dramatic, jaw on the floor difference. But it was clear and audible. And I think that also reflects my system – I don’t currently have a super high resolution setup. It’s plenty resolving enough for me, but in a more high res context, I think the improvements would be even more apparent. For me it felt like ~15-20% improvement. It was substantial.
 Did I switch back? No. And I don’t think anyone else would, either. However, let’s remember that single-ended output transformers are often directly coupled to full range speaker drivers, or to a minimal crossover network – so it is hard to talk about the performance of an opt without considering the speaker coupling. Better iron is better, but I do want to reiterate my feeling that the stock transformers were also very competent. I don’t want that point to be missed. If the cost of the stock amp is stretching your budget, stick with the Elekit-supplied opt’s and don’t sweat it. You will probably have 85-90% of the enjoyment (how can anyone really quantify it?). I’m saying this because, for some of us, another $550 is a big deal. For others, it’s not a big deal, and in that case I can highly recommend the Lundahls. They take this amp to another level, and the cost is well worth it.
So there you have it, it’s a worthwhile upgrade, but not a must do if you’re on a tight budget. I’d rather see someone get into the TU-8600, even with the stock trafos and a cheap set of tubes, than sit it out waiting for enough funds to accumulate. You won’t regret it, either way.
Lundahl LL2770 upgrade: highly recommended!
***************
In the next (and final) segment, I’ll take the TU-8600 out on a road tour, to hear it in better rooms than mine – with better speakers than what I currently have. It may be close to Christmas before I can finish that, I have to catch up on other stuff. As always, we welcome your comments and experiences.
Thanks Noam!
I strongly suggest that anyone building this kit should spend a little time on YouTube learning good soldering and desoldering technique. Soldering isn’t really difficult but things can get messy in a hurry! And solder wick is great stuff! It’s a sort of braided copper that sucks up excess solder when you are removing components. Also a desoldering pump is a good investment.
I miss RadioShack sometimes since electronic shops are few and far these days. B&E Electronics in Calgary is pretty good for soldering equipment ( no affiliation…just a happy customer) and they have an online store. They have very good prices for soldering irons too. I recommend the hakko soldering station. Also for me I stick with the 60/40 lead tin solder. I find silver has too high of a melting point and is a bit harder to work with, but your experience may vary.
I have four elekit amps now and enjoy them all…yes I may have a problem!
Thanks for the review.
Cheers
Nice Noam,
Cart it here the next time you are in Montreal.
Colin
Noam,
You mentioned tubelab. I presently have a breadboarded version of the tubelab se with 300b’s and was curious if you built this amp and how you would compare it to the elekit tu-8600.I may consider the elekit instead for now as I’m at the chassis stage and really don’t enjoy that part of diy.
Thanks,
Ritchie
Ritchie,
That wasn’t me. Steve talked about Tubelab a while back. I’m not familiar with them.
Noam
Ok, thanks Noam.
Considering Hashimoto’s trafo’s a good alternative for TU-8600, I bought a pair of H-30-3.5S O.P.T.’s and installed it. It came with potting and a square tall case, which luckily could be fitten laid down on its side on the trafo bridge. There was just enough speace under the hood with the top cover installed. But because it only has two windings, short of the thid feedback winding of the Elekit’s original OPT’s, I have to use its 16ohm output taps for NFB feeding.
Result: stunning. FR was up a notch in the highs, distortion lower, and it actually runs better with my JBL 4320 (2-way mon 96dB/W/m SPL) giving deeper bass response and better control there.
That cost me nearly $900 though.
Terence
Nice! I guess you aren’t able to use the headphone taps though.
Hi Terence,
Hashimoto OPT’s.
Can you share the modifications needed to install the Hasimoto OPT’s .
I hope so…
Many thanks,
Regards,
Steve
What you have done is increased the NFB levels that the third winding in this version of the elekit was introduced to reduce. Some of the magic may be lost. If more bass and more feedback is what you wanted perhaps it wasn’t a tube amp you needed?
Aitch
I have a pair of JBL L100, sensitivity is 90dB/w/m. Can this amp drive JBL L100’s without issues?
Shouldn’t be an issue, but if you are expecting concert hall levels i.e. limitless clean power, then I’d recommend a more powerful amp.
Does the Lundahl LL2770 upgrade still fit under the cover?
Hi Scott,
Yes, they fit on the rack behind the tubes, which has a taller cover. Once the cover is on there’s no difference from the smaller Elekit trafos.
Noam
Hey.. great review. I am going to build one of these myself. Which 300B’s have you tried with it? Wondering if the JJ or the EH would be sufficient as opposed to the Gold Lion
Thanks, in the Elekit I’ve only tried the Gold Lion, and briefly, the Shuguang treasure tubes. I did a comparison of 300B tubes a few years back that may be useful as you shop for tubes.
https://wallofsound.ca/audioreviews/triode-roundup-seven-common-man-300b-tubes-compared/
-Noam
Hi, I’m enjoying mine immensely with DeVore speakers. Did you ever get to take it on the road as mentioned in your review, and if so will you be reporting on it? Thanks,
Ron
Ron,
The answer is yes and no, long story. I sent you an email to explain.
Noam
Hey Noam,
Did you build your kit stock or use upgraded resistors (the Takman carbon) or Mundorf caps?
Regardless, do you have any thoughts on those upgrade options?
Hi Itsik,
Yes, mine had Mundorf caps and Amtrans resistors. I haven’t compared, but it seems all of VK’s upgrades are worthwhile, and reasonably priced. For a great bang for buck, see if you can get a TKD volume pot to fit in it.
Noam
Hey Noam,
Just finished my TU-8600 and loving it so far. I fitted a TKD pot and it is definitely a nice improvement over the Alps Blue Velvet!
BTW, my voltages are close but I have some variations. I am curious specifically about TP27 and TP28.. were those 20V after you replaced the transistor? Both of mine read 16V
Hello Noam,
Built the TU-8600 in March and have been enjoying so far. I opted for the Takman resistors, Lundahl LL2770 OPTs and TKD volume pot initially. I did swap the supplied output transformers for comparison but quickly went back to the Lundahls.
Experimented with swapping the B+ and C- supply rectifiers. Replaced the supplied HER208 Schottky rectifiers with third generation silicon carbide rectifiers. I used ON FFSP05120A in a TO-220-2L package. Takes a bit of careful lead bending but the 9 rectifiers will fit with no vertical clearance problems.
Listening impression was very detailed upper mids and bass. Very worthwhile modification.
Currently studying the supplied low ESR capacitors to determine the ratings. Newer organic polymer capacitors are available with resistance in the 7 Mohm range.
Squeezing every little bit of detail…
Hi Daniel,
Very cool – thanks for sharing.
Noam
Noam,
You’re most welcome.
Another tidbit I might add, for the renewal parts shelf, some of the semiconductors used in the TU-8600 are considered “end of life” or obsolete and getting harder to find.
One example is the Sanken Electric RBA-406B Schottky Full Wave Bridge rectifier (D105, 205 and 306), used in the filament supply, is no longer listed in Sanken’s product matrix, not even their obsolete list. I’ve only found one distributor in the Philadelphia area that has them.
Another example is the NDDL1N60Z FET (Q102, 202). ON Semiconductor has it listed as “end of life”. I found a good supply at Mouser.
It was not difficult to assemble a spare supply of semiconductors just in case. Also, not a lot of money either. If one intends to keep the amplifier for a while, this would be something to consider.
Again, great info. Thanks Daniel.
I would expect that Elekit has a stockpile of parts for all their models, but I’m not sure. Victor Kung told me the parts failure rate is very low – but of course, the risk of damage while assembling/soldering is real. He usually responds to comments here. As well as on his VK Music forums.
Noam
Just recently built the Elekit 8600s with upgraded Lundahl 2785B transformers and the new Western Electric 300B tubes. It was my first kit and the instructions are well written and easy to follow. The amp is amazing. Exceeds all my expectations. I also have a 300w solid state amp from LampizatOr and have used Melody M845 mono amps in the past. The Elekit is maybe not their equal but hard to tell the difference in pure enjoyment. Highly recommended if you want a 300B tube amp.
Congrats Jason, and thanks for commenting. So are the new WE’s worth the price?
Noam
Hello Noam/group,
Nearly 5 years have passed since I posted about the Elekit TU8600. Thought I’d give a progress report.
After building the amplifier with supplied Mundorf silver/gold/oil capacitors for stage coupling (0.22µfd-C103, C104, C204, C204), I decided to do a little capacitor rolling. I first tried Jupiter copper foil/beeswax. The Mundorfs sound quite good through Spendor BC1s but it seemed as though everything was rather sterile and lifeless. The Jupiter’s cured that right away. Very warm and inviting, took the “sterile” mids out and made vocals believable. Also made the bass a lot more evident and gave it presence, something quite lacking with the Mundorf caps.
But, and there’s always a but, I had 2 Jupiter’s fail rather spectacularly. While listening one day I hear a click out of the right speaker and suddenly nothing out of the right side. When I reached the 8600, the filament in the 300B for the right channel was out. Oh no!! I first thought one of the filaments in the 1998 era Western Electric 300Bs had failed. Pulled the 300B, got out the TV-7D/U tester and nothing wrong with the 300B, still plenty of emission, no shorts, filament fine.
Pulled the 8600 out and skinned it. Powered it on the bench without the 300Bs and began checking voltages. Didn’t take long to find stage coupling C204 had shorted. This would have changed the bias voltage on the 300B to something positive which would have driven the tube into hyper-conduction and a rapid death. However, the 8600 is very well designed to protect the 300B in case of circuit failure. U203, the filament switch for the 300B functioned as intended and cut the filament supply saving the precious 300B. Bravo! Excellent design!
Ok, replaced C204 and all’s well again-for about 9 months. Then again, I hear a loud click out of the right channel and again, the right channel 300B filament was out. Again, I yank the WE 300B, drag out the TV-7D/U and find nothing wrong with the 300B.
So, again, I skin the 8600 and go searching for what I guess was a shorted capacitor. However, this time the problem was worse. I had no B+ supply on the right channel leading me back to the ripple filter Q201/Q202. I checked C204 and again it had shorted. But this time the failure had zapped the aforementioned transistors in the ripple filter of the B+ supply.
I bought a collection of the transistors and semiconductors for the TU8600 shortly after building it just in case. So I had spares to replace and got the B+ supply going again.
I was puzzled why 2 Jupiter capacitors had failed. I can accept one failure as perhaps “infant mortality” but 2, well….
So, I decided to remove all of the Jupiters and research other copper foil capacitors.
Similar to the Jupiters, Miflex also makes a similar copper foil capacitor-KPCU series. I purchased 4-0.22µfd@400V KPCU Miflex. Yikes, I receive them and was surprised how much larger they were than the Jupiter or Mundorf capacitors. Interesting the the PC board layout in the TU8600 left just enough space to fit the leads of the Miflex capacitors without any lead bending heroics. Plus the PC board just fit back in the chassis box without touching-just barely.
Ok, now I had to go through some ageing and listening to get the Miflex capacitors seasoned. The first 20 hours or so was not encouraging. Flat mids, tubby low end and hardly anything on the upper end. Then it happened, around 25 hours, the mids became wonderful, just as the Jupiter’s had done. The bass became very smooth and rounded with an excellent presence. The high frequencies also came back nicely around 35~50 hours. All in all, I’m very pleased with the Miflex copper foil capacitors.
Next thing was the volume control. I used a stepped attenuator in a pre-amp years ago. There was not enough room in the TU8600 to replace the Alps volume control with a stepped attenuator.
Once again, design of the TU8600 came to the rescue. The inline headers which the outboard PC board connects can be easily jumpered with simple jumpers like used on older hard drives for addressing.
Since the TU8600 has more than enough input gain for the sources I have, I decided to try running without a pre-amp. I would need to switch the input sources outside the amplifier.
Goldpoint made the stepped attenuator I used in the pre-amp I built years ago. I contacted them and they make a standalone 4×1 passive input switch along with a 32 step attenuator, model SA4.
So, I acquired the SA4, removed the pre-amp, moved all the cabling. I removed the Alps PC board and jumpered the header on the main PC board.
At the same time, I removed the headphone jack as I don’t use headphones. The internal contact in many headphone jacks becomes a source of trouble down the road.
After removing the Alps control and using the Goldpoint stepped attenuator brought an entirely new listening experience. Tracking is very accurate as the resistors in the attenuator are 0.01% tolerance. Detail increased dramatically.
So now I have the Goldpoint SA4 sitting on top of the TU8600.
I’ve been doing a lot of tube rolling. I’ll post that story soon.
Thank you so much for the updates, Daniel. This will definitely add to the body of knowledge.
Noam