
Digital Serving/Streaming on the Cheap with a Raspberry Pi
(But is it any good?)
By Steve Graham
Part 1: Introduction and Shopping List
The first thing you must know is that I blinked and missed the microchip revolution – it was a very long blink. To those already immersed in the Raspberry Pi-for-audio ecosystem, this article might be irrelevant. This is for those like me: newbies to DIY file-based playback.
The second thing to know is that, as far as this project goes, looks will take a back a seat to performance and price. If you are looking for glitz and bling in an audio component, you won’t find it here. I don’t always look for the least expensive option, but lately I find that reviews of products with gargantuan chassis sporting thick shiny face plates, or speakers selling for a hundred grand or more just don’t grab my attention.
‘Everyone-fi’ may not get audiophile pulses racing, but good value is something that might just get the attention of those outside of our little community. Potentially, almost everyone is an audiophile, at least that’s my theory. They just need to be exposed to no-nonsense, good-sounding and inexpensive audio gear to get them started. For pre-existing audiophiles on a strict budget, decent, inexpensive fidelity is always welcome.
Now Playing
I have two streaming systems in my home. Both are neatly-packaged solutions for file-based audio playback. They aren’t inexpensive, but made for persons like myself, who haven’t (up to now) wanted to immerse themselves in computer minutiae during setup. As well, both provide a mostly glitch-free user experience/interface that enables all household members to easily play music.
Backing Up
Why take a step back and build a server/streaming system? Well, two reasons really. 1) I wanted a challenge that would take me outside of my comfort zone, and 2) I have friends who are budding but impoverished audiophiles that could benefit from an inexpensive, high-value, server/streamer. I’m sharing this because I believe in what a former boss of mine called “tribal knowledge.”
In the last year or so my friends have replaced their no-name speakers and ancient mid-fi receiver with a pair of small Wharfedale Diamonds and a NAD integrated amp. The days of their previous-millennium disc spinner are numbered. Might it be possible (for me and by extension, other computerphobes) to implement a cost-effective file-based system? Keep reading.
Moving Ahead
True confession time. Like a lot of people, I was inspired by experiences and encouragement from others. In this case it was one of the excellent videos by John Darko. Specifically his article and accompanying video. https://darko.audio/2020/07/a-short-film-about-the-raspberry-pi-as-music-streamer-and-server/
John’s video gives a general overview of the process required to turn a Raspberry Pi (RPi) into a server/streamer with audiophile-grade sound quality. My contribution is to take the pointers from John, make them make sense to me, then pass on any tips and gotchas to persons with a level of computer proficiency similar to mine. Which, for a digital dufus such as myself, means not very proficient. Please don’t take offense, I’m not purposely talking down to anyone. My only assumption is that there are others like me who need a bit of a hand up. There are forums that delve deep into all things RPi, but these can be intimidating for noobs such as myself.
Some might consider this approach, about $300 Canadian all in (~$200 US), too inexpensive to be considered serious audio. Just consider this: some commercial streamer products are based on the Raspberry Pi. As well, audio is all about adapting prosaic parts for a higher purpose. Many DIYers will, for instance, employ industrial oil-filled motor-run capacitors for better sound in tube amps and speaker crossovers.
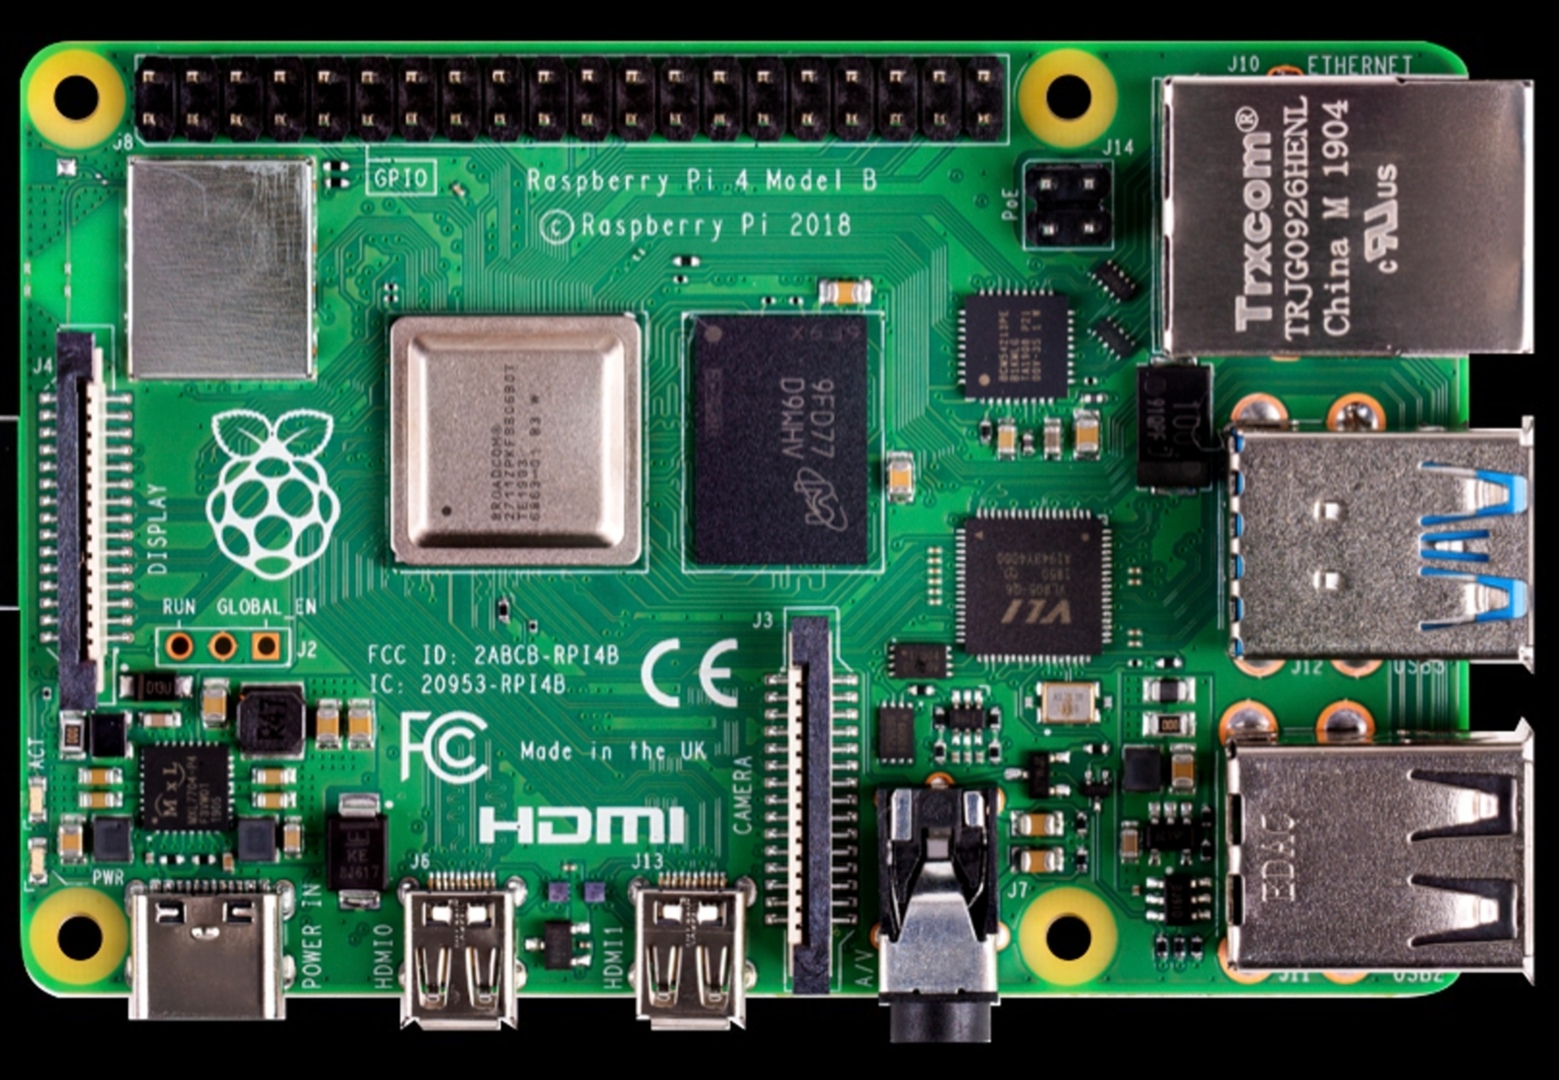
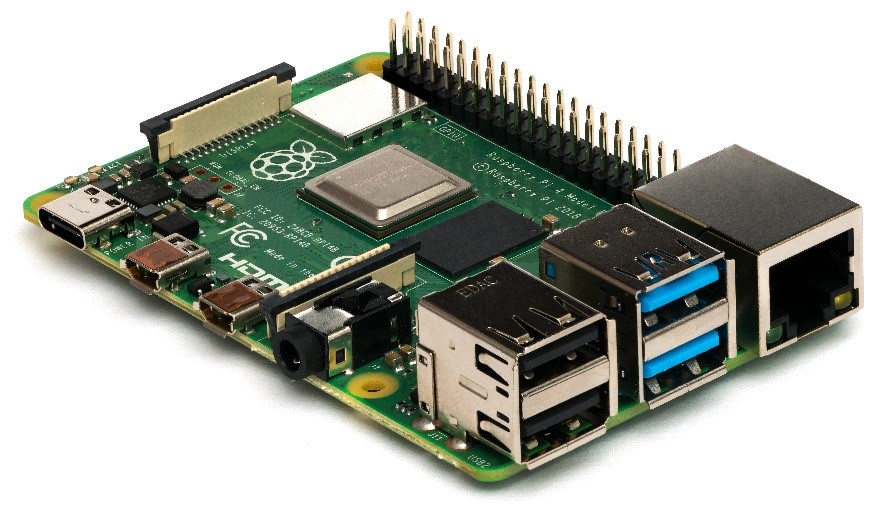
Hats On
What I’ve built is not the least expensive way to get music out of a Raspberry Pi. There’s an analogue out on a 1/8” headphone jack right on the Pi board. Alternatively, a DAC can be connected to one of the USB sockets. Both, especially the headphone jack, don’t yield optimum sound quality (SQ) according to the reading and YouTube research I’ve done. At Wall of Sound we’re all about the SQ. The recipe for better performance is to piggyback a HAT board (Hardware Attached on Top) on to the RPi board. HAT boards for better audio are available from a number of sources. Allo and HiFiBerry are but two examples. It’s possible to add a DAC HAT for anywhere between $20 to more than $300. Unless you are really cash-strapped, it makes sense to spend at least $50 or so for a DAC HAT.
The route I chose is a little bit (geddit?) different. I added a digital-out HAT board to the RPI for three reasons. 1) My friend’s NAD amp has a DAC built in so it might as well be pressed into service: isolating the DAC from the RPi could yield better sound. 2) The RPi + digital HAT will allow me to output data to my PS Audio DirectStream DAC. So, a shootout between the RPi and my NAD 50.2 player is definitely on. And 3) Unless some heroic (read: expensive) measures are taken, it’s likely best, from a SQ perspective, to not power a HAT DAC board from the RPi board.
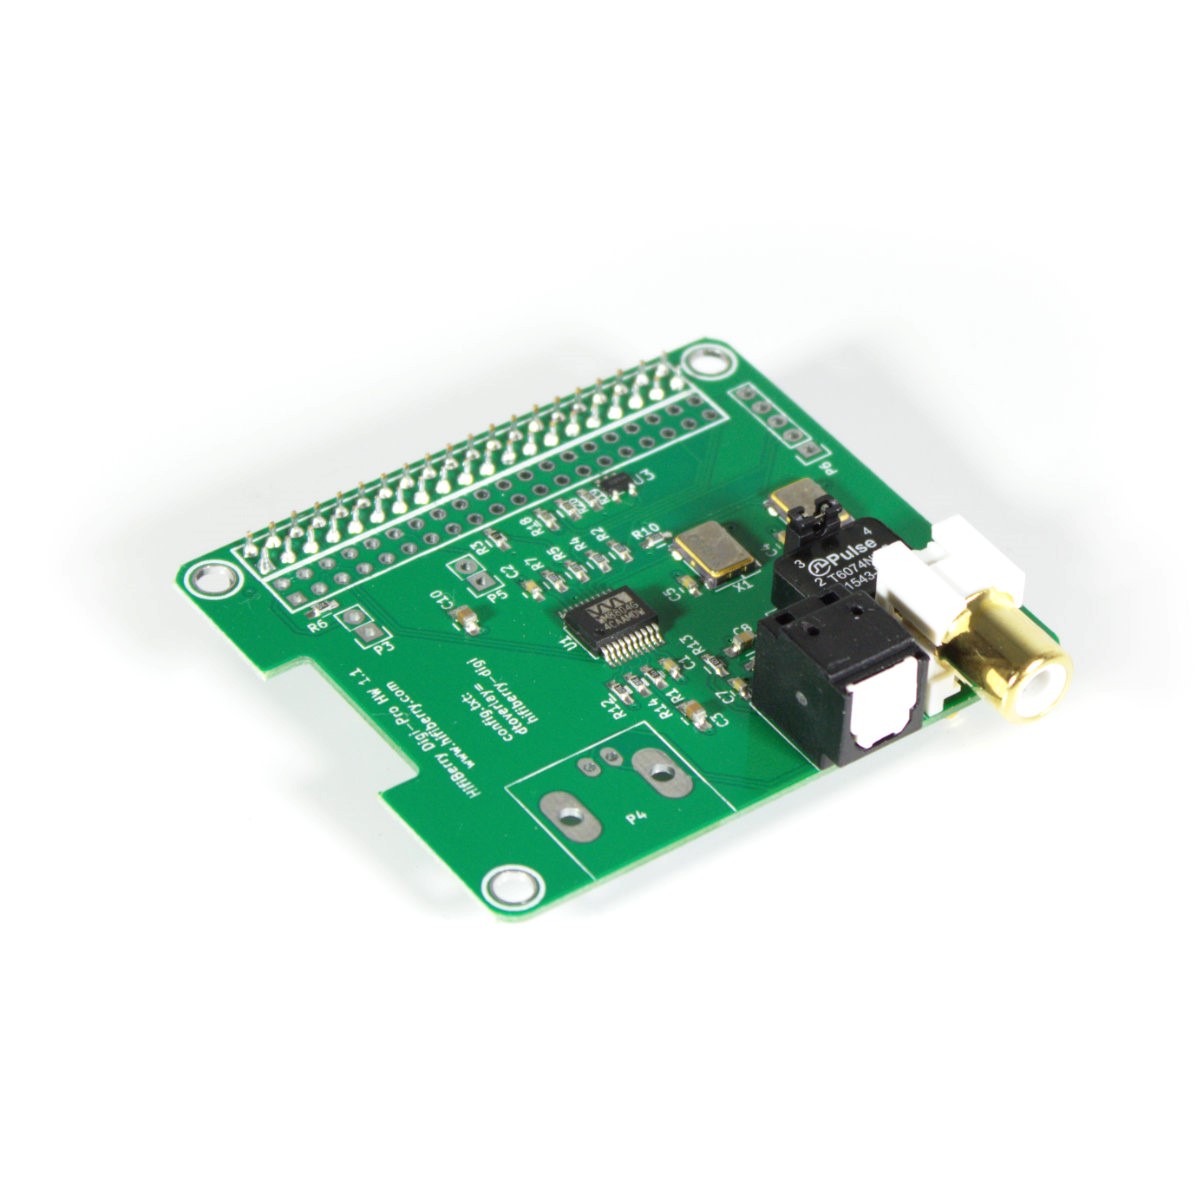
The HiFiBerry Digi+ Pro Hat that I chose will output standard S/PDIF data through coaxial (on RCA) or optical (on Toslink) connectors. S/PDIF (Sony Philips Digital Interface) is perhaps the most common digital transmission format. CD players with digital outputs use this format. The Digi+ Pro also has dual oscillator crystals for 44.1 and 48 kHz sampling rates and their respective multiples, which should help optimize SQ for all sampling rates. A small transformer isolates the coaxial jack from the rest or the circuitry, to help prevent electrical noise from polluting the data sent to the DAC. Pretty impressive for 57 bucks Canadian ($40 US), in my estimation.
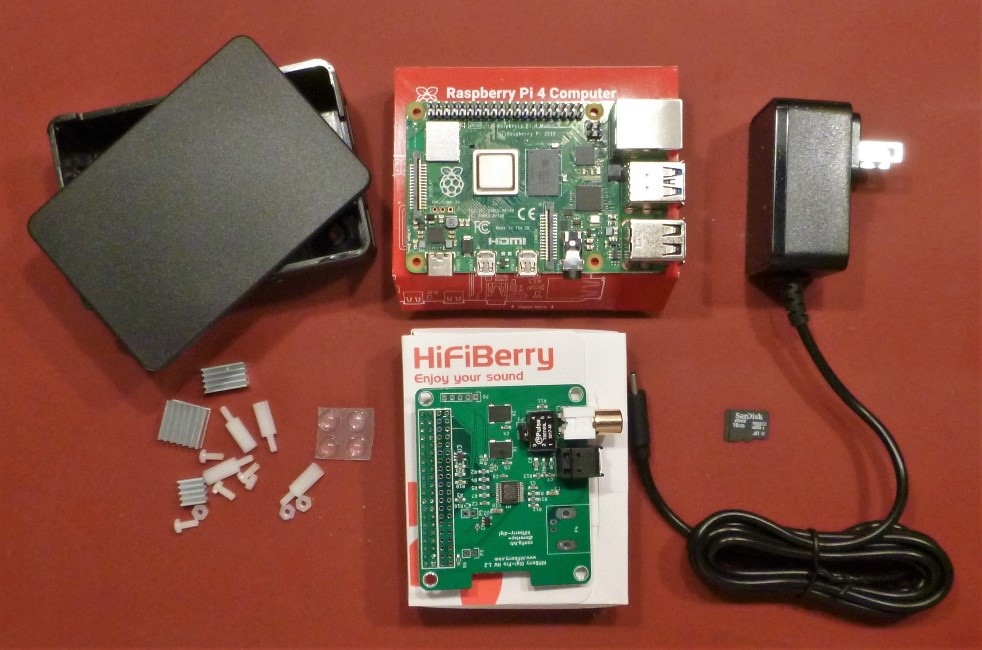
Shopping List
I chose BuyaPi.ca as they are a HiFiBerry dealer. I bought a Raspberry Pi starter kit and micro SD card from them as well, so I only paid shipping once. In the US, PiShop.us, sells RPis and products from many HAT makers. Currently, with delivery infrastructure stressed to the max and to minimize delivery time, it makes sense to avoid having parcels cross international borders. Once you’ve decided on the HAT you want, check the manufacturer’s website for a seller in your country. The seller will invariably sell RPis and accessories as well. Prices shown are Canadian dollars, unless otherwise noted.

HiFiBerry Digi+ Pro $56.95
—————————————————————
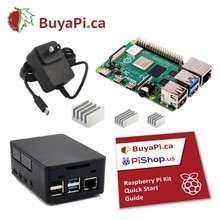
Raspberry Pi 4B Budget Kit. Memory Size 2 GB. $69.95
—————————————————————
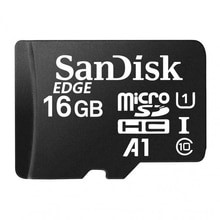
SanDisk Edge 16GB MicroSD Card $8.95
—————————————————————
For a total of about 136 bucks Canadian (~ $100 US,) not including tax and shipping, we are almost ready to go. A digital cable will be needed to connect to a DAC. A throw-away video cable (the sort with yellow RCA plugs) will do to get us started but a proper digital audio cable will sound better, more on this later.
As well, a hard drive or solid-state drive will be required to hold music data. A 1TB external hard drive (often referred to as portable or backup drives) can store several hundred CD rips. These can be had for between $70 and $90 from the usual outlets.
Updated as of October 12, 2020:
While setting up a RPi player for a friend, I’ve discovered that the PiCorePlayer software doesn’t play nice with Western Digital USB drives, causing it (the software) to stall during setup. I don’t know a way around this and I’m loathe to even attempt a dive into coding. Several Seagate drives and one Verbatim drive I tried worked without glitches. Apologies to anyone who has had a hiccup with a WD drive and is now cursing me. The programming attachment in Part 2 has been revised to reflect this frustrating “gotcha.” This is not to be construed as a slight against Western Digital drives. They have worked without issue when connected to my wife’s Lumin player and have performed faultlessly for other data backups. (Editor’s Note: I had some compatibility issues with my WD drive, which were solved by using FAT32 formatting)
An ethernet cable to connect the Pi to your network will be required. A laptop or desktop computer will be needed to load software onto the RPi’s Micro SD card and configure it. I’m assuming you already have or have access to a PC or MAC. Once set up, the Pi can be controlled by the PC or MAC but most people will likely prefer an app running on a smartphone or tablet. I’m also assuming that most people will already have one or the other device, if not both.
Except for smartphone or tablet apps ($10 to $14), all of the other software required is FREE!
If a digital-out HAT is used, a cable will be needed to connect it to a DAC. The aforementioned video cable will work but is nothing special. One step up might be a specific digital audio cable. An Amazon Basics cable can be had for about $12. Search: “75 ohm digital audio cable”. Of course, one can spend over $1,000 on a S/PDIF cable, but it’s hardly worthwhile in this instance. A decent inexpensive cable I like is available from HAVE Inc. A 3-foot cable with decent Canare plugs sells for about US $26. One of these from my motley collection of cables will be employed for the SQ evaluation. If you go with a DAC HAT, a digital cable won’t be needed, just a pair of analog interconnects.
All-up, including hard drive, shipping and taxes, expect to spend about $300 (~$200 US) for a complete server/streamer/storage setup, ready to play music.
If you’re not sure about your ability to program the RPi and set it up, see the second installment in this series before ordering any hardware. Otherwise, order your Pi and other bits. If you’d rather go with a DAC HAT to output an analogue signal to an amplifier, by all means order one instead of a digital-out HAT. A fairly decent looking one is available from HiFiBerry for the same price as the Digi+ Pro board I bought. ALLO and others offer DAC HATs too. The setup procedure for a DAC HAT will only deviate slightly from that used with a digital-out board.
Part 2 is coming soon. Sign up below for notification if you wish. We don’t collect any personal information.

Please recommend a good, but inexpensive, DAC for an analog-only reproduction system. I would probably use an optical connection from the HAT output.
I have a similar setup at home and, while it isn’t as quick when browsing our music library via the app on our phones or via web browser from a computer, it works and sounds great. We use a Raspberry Pi3 (RPi) with an attached USB hard drive as a music server running LMS (an easy way to build this is to use a pre-packaged OS like Max2Play which supports a wide range of hats for the RPi, as well as multi-room playback with multiple RPis). That RPi hosts a music library with nearly 3000 albums comprising nearly 400,000 tracks.
We then have a separate mini-computer (in this case, a Cubox-i but could be an RPi) that runs squeezelite and serves as the streamer into our DAC (via USB). These two mini-computers are connected via Ethernet.
For playback, we use either a web browser from a laptop or OrangeSqueeze on our Android phones. The entire two-computer system cost less than US $300 and sounds great by itself but, even better, its low cost has allowed me to divert our spending into other components of our 2-channel system where we get even more bang for the buck (speakers, amps, even re-clocking the incoming USB stream before it goes into the DAC).
Using a pre-packaged operating system like Max2Play makes set up easy for people unfamiliar with noodling with computers (you just need to be able to follow instructions to write the operating system to a microSD card.)
It is great you are writing this series of articles so others can see how easy it is to achieve great sound on a budget!
I saw the same video and went down the same route and have encountered nothing but problems. Setting up a RPI is no easy task. I’m not a computer geek but neither am I technologically challenged. Even after setting up everything as suggested on the Picoreplayer website, things didn’t go well. When I got everything sorted out and hooked up my external HDD, the LMS set up recognised all the folders on the HDD EXCEPT the folder with all my music. After more than 10 attempts, I just gave up.
I’ve been using a variety of Pi’s as ROON endpoints and standalone streamers for a few years now. Marvellous little devices that are a steal. Many folks are scared off by what they perceive as a complex setup, they’re used to plug and play convenience. I’m 70 and can set up a stable wireless or wired streaming platform in 15 minutes.
Have you tried the ifi ipower 5v supply. For me it makes an improvement.
Thanks to all of you for commenting.
Mr. Kiley if you can be patient I recommend a few possible upgrade and DAC scenarios in part 3 of this series. Typically you will get better sound using a wired connection rather than the optical connection. It’s a matter of the wired connection having less jitter.
Reza, don’t give up yet. I too had some issues but in part 2 there will be an attachment to take you through the procedure step by step. I not only got it working but followed my own instructions to debug them as well. I must have re-flashed the uSD card about ten times to start over from scratch each time. I also encountered the problem you had finding music files. I got so that by the tenth time through I could do the setup in about 5 minutes. Hang in there. Bug my editor to post part 2. 🙂
Mr. Cummings, I believe what you say about the iFi power supply. I probably won’t try it. This project will likely be gifted, the recipient can pursue this if they wish.
Steve
An FYI if you intend to power the 4B with an upgraded supply such as the iFI Ipower. This latest generation of Pi’s needs a bit more current especially if you are going to be adding HATs or USB DACs. 3Amps is best. The older 5VDC iPower was 2.5Amps. I just checked their website and it looks like they’ve increased it to 3Amps on newer models. Watch out for that if picking up a used one.
Hi Steve, I have a Oppo DV 980h universal disc player. It plays everything, 24-96, sacd, even decodes HDCD cd’s. It was not very expensive and has played flawlessly for 10 years or so. How could I implement the Raspberry Pi into my system for better sound and convenience. Can I rip all my physical media to storage and play it back, i’m behind the digital curve also even though my son is an IT guy and I have an iPad.
Thank you, Mike
Mike, thank you for your interest in Wall of Sound.ca.
I’ve heard nothing bad about Oppo players. I believe Oppo is no longer in business but there is support available for their players. At 10 years old you have done well but someday it will expire. You might want to start transitioning your library of CDs over to digital files. If you have many HDCDs it might be worthwhile using dBpoweramp (which costs about $40) to rip them as it will preserve the “extra” info encoded. Exact Audio Copy (EAC) is free and works well for standard CDs. I’ve used both, it’s not a very daunting process and I’m the original digital dufus. There are YouTube videos for EAC and I believe dBpoweramp too.
I believe it’s possible to rip DVD audio discs with the right software and a CD/DVD drive connected to a laptop/desktop.
Retrieving DSD data from SACDs involves a fairly convoluted process. See the link below, the info starts part way down the page. DSD files would likely need transcoding to PCM to play on a Pi-based system.
Without knowing the rest of your system and your budget it’s difficult to make a recommendation. See part three of the Pi series for shopping scenarios. My preference is to install a HAT board on a Pi to output digital data to an external DAC. Does you Oppo have a digital input that would allow access to its DAC? If that’s possible connecting it to a Pi could be a temporary solution.
Controlling a Pi with an iPad running the iPeng app is a fairly slick solution to accessing your music library.
Have your son take a look at the attachment for part two of the Pi series to get an idea of the setup. He’ll probably get a chuckle at my, no doubt, amateurish attempt at digital instructions.
I hope this helps. Regards, Steve
Oops, link didn’t make it into the comment. Try this:
https://www.stereophile.com/content/music-round-93-minidsp-ripping-sacds-page-2
Thank you Steve for your response, I’m thinking the best way would be to have a server for CD’s & hi-rez downloads since most of my collection are CD’s. Then if my Oppo failed I would just replace it with another universal player, You mentioned my stereo system. I own a lot of vinyl but don’t currently have a turntable setup, so my source is the Oppo & radio. We have some good stations in the Worcester-Boston area. I have a pair of Grant Fidelity MBS-1 monitors driven by a Onix SP-3 integrated tube amp / crossed over to a pair of 12”JBL woofers taken from an old pair of L-100’s. The woofers are driven by a Bryston 4B amp, this is all tied together by a Khozmo Acoustic passive pre-amp from Poland. (3 inputs/ 2 outputs ). The system sounds amazing, but didn’t sound amazing until I added to Khozmo.
Like analog playback digital sources sound different, I’d be looking to improve on the sound of the Oppo. It wasn’t the top of the line Oppo. Thank you for responding so quickly, best regards, Mike