

Classic Style. Classic Circuit. Classic Sound?
By Steve Graham
SunValley – that’s the way they spell it, without a space between the Sun and the Valley – is a division of the huge Toyota corporation, manufacturer of motor vehicles. I suspect there is a member of the Toyoda family (yes, Toyoda is the correct family name of Toyota’s founder) or that one of the senior vice presidents of the corporation is a tube-loving audiophile. Anything that brings more tube gear to us geeky audiophiles is fine with me.
But first: this is going to get wordy. I think kits deserve extra attention, so a few highlights from the build process are presented at the end of the review. Also, because my name is Steve Graham and as different tube types are encouraged both by SunValley and VK Music, I’ll do a bit of tube rolling too.
Features:
– Based on the classic Marantz 7 circuit
– Power supply: 5AR4/GZ34 Tube rectifier (silicon rectifier also supplied) for B+, regulated filament supply
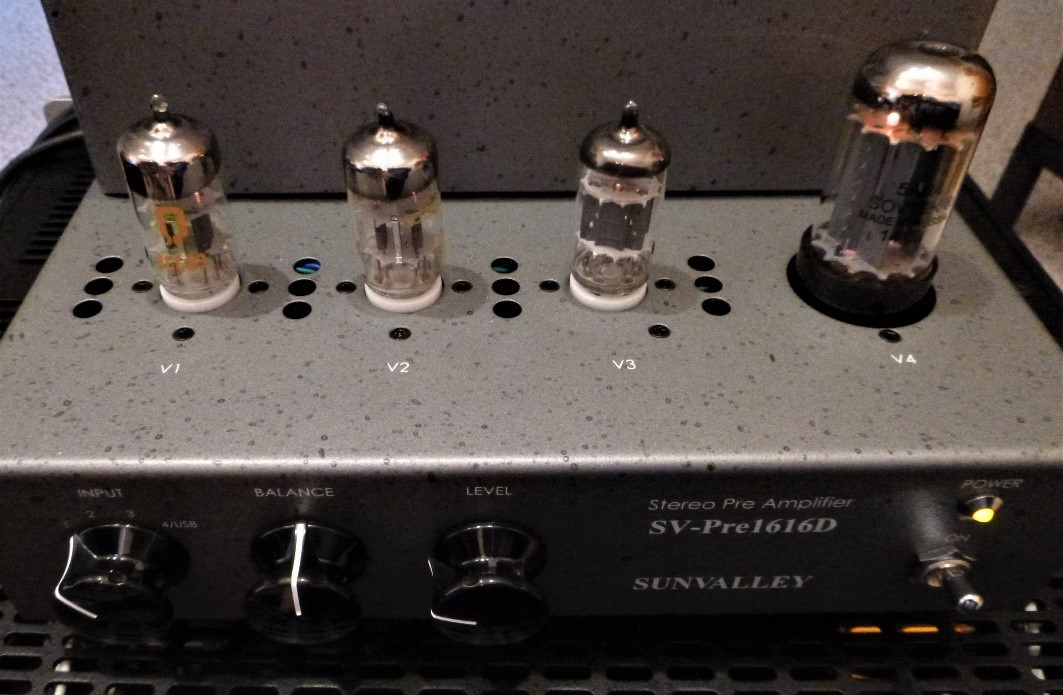
– Amplifier: Two 12AX7 and one 12AU7 (see below)
– Four inputs, one switchable to optional USB dac
– Volume and Balance controls
– Amplifier portion point to point wired, power supply on a PCB
– Price: $795 US, not including tubes
Description:
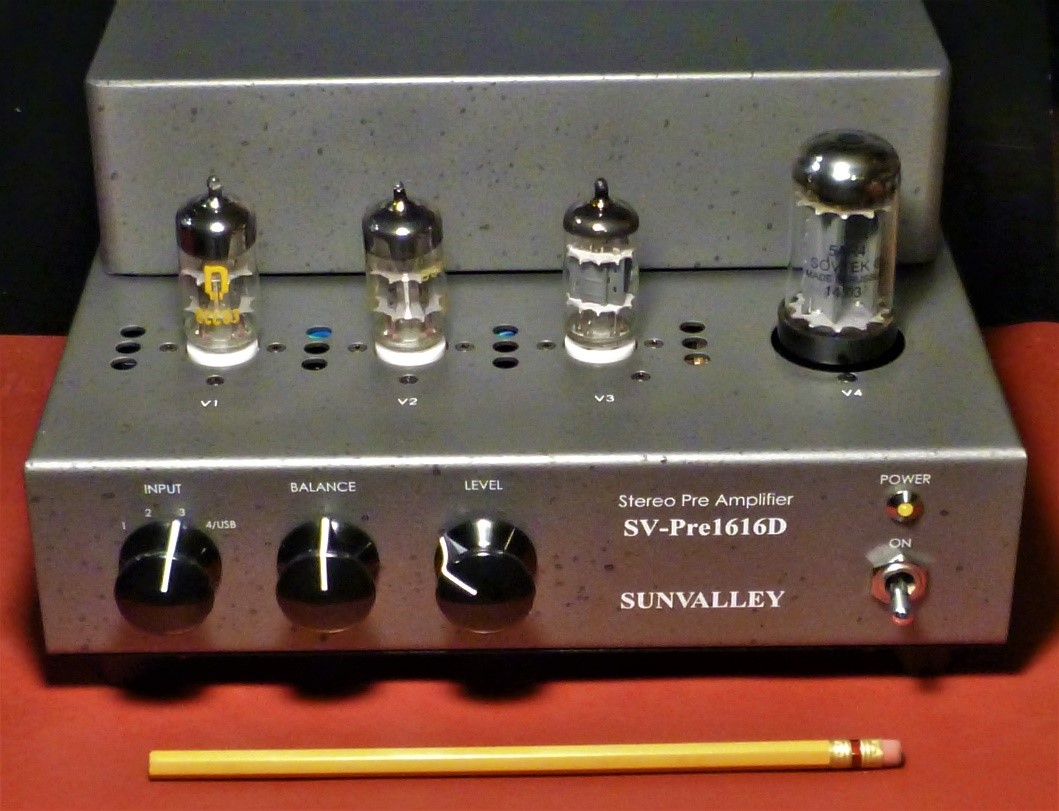
A friend’s significant other, to whom I’m no longer speaking, once described the styling of an Elekit amplifier as looking rather “Soviet”. Elekits looks positively art deco compared to SunValley amplifiers. Let’s just say the SV-Pre1616D reviewed here looks elemental. Personally, I don’t see anything wrong with the way it looks. I could even put it in my living room on a shelf partially hidden away, but I have a very tolerant significant other.
SunValley unabashedly state that the SV-Pre1616D is a “marantz #7type Pre AMPLIFIER”. The original Marantz 7 was a full function preamplifier, and in that era no preamp was complete without a high gain stage for boosting the signal from magnetic phono cartridges. The Pre1616D is essentially the line stage section of a Marantz 7. I did a web search for the Marantz schematic and found that it had a solid-state rectifier – whereas, the 1616D is even more retro than the original, as it sports a tube rectifier. SunValley does supply a solid-state rectifier module that will plug into the rectifier socket in place of the 5AR4/GZ34 tube. The Pre1616D voltage-regulates the filament supply, the Marantz did not. The circuit is structured such that each channel has its own gain tube, both sections of a 12AX7. Each channel uses one half of the output tube as a cathode follower.
Another departure from the Marantz original is the choice of signal tubes. The Marantz used all 12AX7s in the line section. The Pre1616D, as I built it, uses two 12AX7s for gain, and a 12AU7 for output. At least that’s the baseline setup from what I could glean from the assembly instructions. Other possibilities, suggested at the SunValley page on the vkmusic.ca site and the assembly instructions, include all-12AU7 and all-12AX7 variations. In my estimation, a 12AX7 won’t make a good cathode follower as it doesn’t yield a sufficiently low enough output impedance and, in this circuit, would be run quite hard as well.
My experience with modern 12AX7s leads me to believe that they won’t dissipate anywhere near their rated power, let alone a significant percentage of it, and will expire prematurely when forced to do so (the 12AX7 gain tubes, V1 and V2, are run very conservatively in the Pre1616D.) Compared to the 12AX7, the 12AU7 (and 12AT7) have much higher power dissipation limits, and, along with a lower output impedance, make for better cathode followers. In general terms, a lower output impedance will drive capacitive cables better, and will drive lowish input impedance power amps without bass roll off. As well, 12AU7s, in the estimation of myself and others, aren’t very suitable as gain tubes due to their inherent non-linearity. Having said that, I’ve heard some 12AU7 implementations that displayed decent fidelity. I suppose one might even try some 12AT7s in the Pre1616D if they wish. No harm will likely come to the tubes or the amp doing so.
A balance control is a rare thing on recent preamps, but is useful when using analogue, especially vinyl, sources. I commend SunValley for including one on the SV-Pre1616D.
Victor Kung, of vkmusic.ca, the distributor or SunValley products in North America, was on the road and couldn’t supply tubes with the Pre1616D kit I received. I pinched some recent production Sovteks from my own gear. The exception was the 12AU7. A NOS Amperex I had hidden away was dusted off and pressed into service.
I built the kit up myself from the Japanese instructions. Victor has been too busy on the audio show circuit of late to translate the manual. The printout Victor supplied with the kit I built had many colour illustrations and was quite easy for an old DIY hand like myself to follow. At the end of the review I’ll describe some of my experiences building the kit, and some tweaks an owner of this kit might want to try.
System:
After about 150 hours of burn-in, I sidelined my ARC Reference 3 line stage and connected the Pre1616D in its place. Though my ARC REF 110 power amp is designed for balanced inputs, it doesn’t seem to suffer appreciably when driven by single-ended line stages. Mostly I used digital source material, both CD and higher resolutions supplied by a NAD 50.2 player feeding a PS Audio DirectStream DAC. I spun a bit of vinyl using my prototype Tetra phono stage. A K&K Lundahl SUT-ing an Ortofon Quintet Bronze on my Pro-Ject ‘table provided the analogue signal. All were powered by a PS Audio AC regenerator. Spendor D9s did the loud speaking.
Sound:
I played a bunch of music over the break in period but for the critical listening I settled on the following tracks:
– Ralph Vaughan Williams: Fantasia on a Theme by Thomas Tallis, Argo all-analogue LP from 1972
– Keb’ Mo’: Move, from the Album Blues America, 2014. CD rip
– Mark Knopfler & Emmylou Harris: This Is Us, from All The Roadrunning, 2006. CD rip
– Bruce Cockburn: All The Diamonds, from Waiting For A Miracle (Singles 1970 – 1987). CD rip
– Tangerine Dream: Cloudburst Flight, from the album Force Majeure. CD rip
– Loreena McKennitt: Penelope’s Song, from the album An Ancient Muse, 2006. CD rip
How would you describe “Classic Sound?” To me, it has a negative connotation. With tube amps I think of it as a midrange-y sound with not particularly detailed highs, and slow, mushy bass.
How does the Pre1616D fare sound wise? In two words: darn good. This was in comparison to my two-chassis, tweaked-out Aikido line stage. My Aikido is the bigger sibling to the more basic Aikido outlined in the line stage series from 2016. Wired on turret boards in a bespoke chassis, with a stepped attenuator, regulated filaments and B+, Mundorf Supreme output caps, and a combination of select new and NOS tubes, my Aikido can run with the big boys. It won’t necessarily catch them but it will give them a good race.
For those unfamiliar with the Aikido circuit it is, in essence, quite simple. A stereo Aikido line stage consists of four dual-triode tubes, a hand full of resistors and one capacitor per channel for output coupling. With sympathetic tube selection, the Aikido can be an overachiever that will challenge much more expensive commercial amplifiers. The Aikidos don’t use any loop feedback, which I think is one of the reasons for their speed with transients and bass lines – and a general ease of musical reproduction. Not all of this is a given though. Good power supplies and decent passive parts are required. I consider my Aikido the benchmark for line stages in the one to two-thousand-dollar price range. One thing with the Aikido line stages is they invert signal polarity. To keep the same phase as the Pre1616D, which does not invert, I reversed the polarity of the speaker leads at the power amplifier when listening to the Aikido. I switched them back when the Pre1616D was in the system. All of my listening was done using a 5AR4 tube to supply B+ voltage. I didn’t try the silicon rectifier module.
At first listen the Pre1616D and the Aikido sounded more alike than different. After surfing through a lot of music on my NAD player, differences began to become apparent. The Pre1616D was a bit brighter in the high treble, but not to the extent of fatigue, at least as long as recordings aren’t overly bright. Some of the Keb’ Mo’ and the McKennitt can be a bit tizzy at times, and the Aikido sounded slightly better with these tracks. Oddly, for a component with smoother high frequencies, the Aikido seemed to have better attack, slightly better presence perhaps, especially on the picked acoustic guitar heard on the Keb’ Mo’ and Cockburn tracks. The difference wasn’t huge. It took a bit of toing and froing between the two line stages to notice it. The strings on the Vaughan Williams (vinyl) recording had a bit more detail, sounding somewhat sharper but slightly less liquid, through the Pre1616D.
In the midrange, the Aikido had a slightly more suave presentation. Male vocals from Messrs. Cockburn and Knopfler seemed a bit more fleshed out. Female vocals from Ms. Harris and Ms. McKennitt were more engaging, almost like they were a bit closer to the microphone when the Aikido was in the system. Again, the difference wasn’t huge, but noticeable when switching from one amp to the other. Perhaps due to its more expressive midrange, the Aikido painted a more dimensional picture of the sound stage, especially with the Vaughan Williams. The slightly brighter treble of the Pre1616D seemed to better locate instruments within its somewhat flatter sound stage.
Both line stages dug deep in the bass, and both had good pace and drive. The Aikido was slightly better, noticeable on the Knopfler/Harris track, slightly more so with the Keb’ Mo’. The piano near the end of the Knopfler/Harris seemed a bit more fluid with the Aikido in the system.
I don’t want to give the impression that the Per1616D was a distant second in performance. It was very close to the other preamp. I consider this a sterling achievement. All in all, the SunValley amp acquitted itself quite handily. Being a mostly point to point wired kit lends itself to owner involvement. With some sympathetic parts upgrades, which I’ll describe later, the Pre1616D should be able to raise its game. I purposely didn’t install any exotic tubes during the comparison, just the kind of run of the mill decent tubes that most buying this amplifier would likely start with. I expect many will season to taste with some vintage or other favourite tubes.
Tube Rolling:
I couldn’t resist trying different tubes. I don’t think it’s fair to tease you with results using high-dollar NOS tubes and besides, I’d sold off most of my classic 12AX7s to finance the build of the N-F-P phono amp earlier this year. The 12AT7 is the Cinderella of the 12A-7 family. This often-neglected tube seems, in my estimation, to combine the best of the ‘AU7 and ‘AX7 while dodging their worst traits. NOS examples made in Europe and the US are often available for a fraction of the price of their ‘AU7 and ‘AX7 stable mates. I’ve found recent production 12AT7s to be reliable and decent sounding. I believe finished audio gear should be evaluated with the tubes provided. I didn’t do any tube rolling with both of the Finalé amps reviewed for WoS. Kits and other DIY concoctions are a different matter.
I installed three East German RFT tubes made in the 1980s. A 12AT7 in the output tube position (V3) and two 12AX7s into the gain sockets (V1 and V2). All three of these tubes had spent some time in other components so were broken in. The RFTs are, in my opinion, alternatives real people can afford compared to win-the-lottery NOS Telefunken prices.
The sound of the Pre1616D changed appreciably with the RFTs installed. In a nutshell it sounded more “classic” in that the bass was noticeably richer, but also a bit slower. Maybe three RFTs is too much of a good(?) thing. For my tastes, I found the bass a bit ponderous. Quick and snappy is more to my liking. Also, it was as if a tone control had been nudged a bit raising the bass end of the spectrum by a dB or so and lowering the treble by about the same amount. As always with tube rolling, your mileage may vary. The take-away from this is that, for better or worse, depending on your point or view, the Pre1616D is eminently tuneable.
My advice to potential owners would be to start with a basic set of Sovtek or JJ tubes. Next, upgrade the volume pot and coupling caps, if not done at the initial build. (See Building the Kit, below.) Following that, I’d try an RFT 12AT7/ECC81 in output tube (V3) socket. The RFT is usually available for less than 20 bucks from the usual suspects.
Building the Kit:
At 25cm wide (just under 10 inches) the chassis is quite compact. The power supplies, both filament and B+, are built on a small circuit board which is easily assembled. Care must be taken however, to get polarity and orientation correct on the electrolytic capacitors and filament bridge rectifier. It may or may not be mentioned in the Japanese text, but it’s a good idea to apply some thermal compound between the filament voltage regulator device and its heatsink. Screw terminal connectors make it easy to link the supply board to other components and circuitry.
The chassis itself is nicely made and painted, but you have to like the retro speckle effect. Maybe SunValley should hit up Toyota for a Camry silver, or Lexus for a luxe metallic blue paint job. A paint makeover and less industrial-looking knobs would give the Pre-1616D a more Shindo-like vibe. The tube sockets, transformer and other pieces lined up nicely with their appropriate chassis holes and force was not required to make anything fit, though the screw holes in the bottom cover could have been more accurately positioned. The retro-looking LED indicating power on is a nice touch. The parts are all decent quality, though not especially noteworthy. At this price level you can’t expect exotic or even semi-exotic parts.
Even though some of the text was in English (most was in Japanese), I was able to easily deduce from the illustrations which screws, nuts and washers to use and where the various electronic parts and wires connected. Extra fasteners were supplied, which is nice, as Murphy’s law dictates that if you just have enough, then one or more of the little blighters will go walk-about.
The point to point wiring between the tube sockets and the terminal strips was nicely laid out, but fiddly and a bit time consuming. One of the things about point to point is it’s usually easier to correct mistakes than circuit board-type construction (I made one but caught it almost right away). It’s also easier to substitute other parts at a later date, if desired.
I found the small chassis a bit tight at times, but then I don’t have especially nimble fingers. To ease the process of soldering wires to the input jacks, I changed the order of assembly a bit. I connected the wires from the input selector switch to the input jacks before attaching the switch to the chassis. A flex coupling between the switch and the shaft from the front panel knob would be easier to fit, and more free-running than the solid coupling supplied.
The supplied wire has PVC insulation. I typically use Teflon-covered wire, so I had to watch my soldering technique to avoid singe marks. The metal tags on the terminal strips have sharp points, and though I never cut myself, they did aggravate from time to time, especially in the tightest confines of the chassis. As usual, a little therapeutic cursing helped when parts were being recalcitrant and digits were being jabbed. There were no sharp edges on the chassis itself.
I’m always wary when bare wires are in close proximity to one another, so I covered some component leads with stripped-off insulation from my Teflon-covered hookup wire. These are the blue “sleeves” seen on some of the resistors and capacitors in the photo below. Suggested cable routing to the output jacks is between the power supply board and the top of the chassis. This makes me a bit uncomfortable, as potential chaffing over time could prove calamitous. I covered the cable with some heat shrink tubing for extra protection.
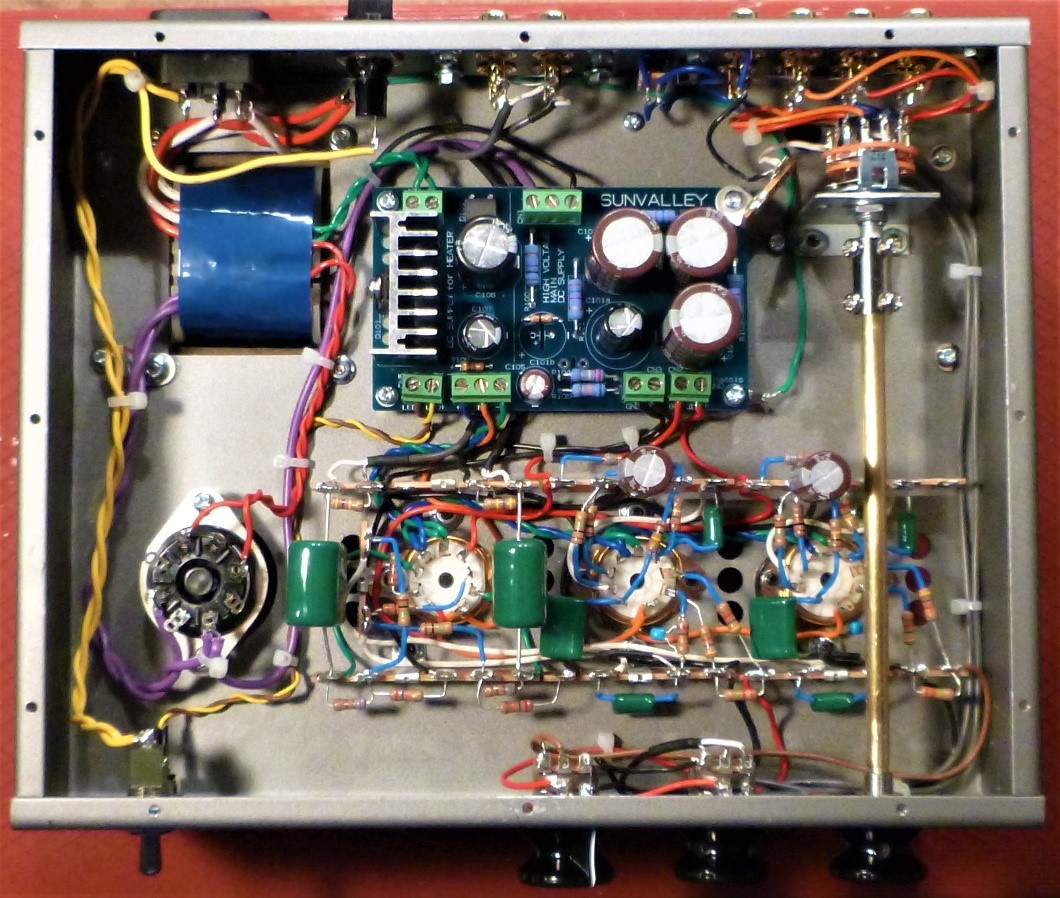 The supplied AC inlet was only a 2-pin affair, no ground connection. I consider this unsafe on a metal chassis, so I installed a 3-pin unit. Using a toothed, locking-type solder lug, the AC inlet ground was connected to the chassis where the power supply board grounds to the chassis. (The green wire seen at the lower right corner of the power supply board in the picture above.) A 3-prong AC cord was used, the 2-prong cord supplied with the unit was not.
I wired up the transformer, power supply board, AC wiring, power switch, pilot light and tube filament wiring first. Though not shown in the assembly illustrations, best practice dictates twisting the wires to the filaments, even though they are fed DC voltage. Before proceeding with the remainder of the wiring, I installed the three 9-pin tubes – the rectifier socket was left empty – then fired the preamp up. The tubes lit up fine and the filament supply measured dead-on 12 volts. I powered down and disconnected the AC cord before proceeding with the remainder of the parts installation and wiring.
Upon completion, all tubes were installed and the unit switched on. After a minute or so warm-up, a few voltage measurements indicated that the Pre1616D was functioning as expected.
Altogether it took me about 16 hours to assemble the ‘1616D. It was off and running right out of the gate.
If I were building this unit for myself, I would install an Alps RK27 volume pot at initial assembly. These approximately cube-shaped units, measuring roughly 1” a side, have better tracking between channels, especially at low volumes. Know informally as “Blue Velvets” due of their colour and smooth operation, they can be had for between ten and twenty dollars.
I couldn’t see any manufacturer or model designation on the coupling capacitors. They are likely reasonable in view of the price of the Kit, but again, if this was my preamp, I’d install something a little more upmarket. The Cornell Dubilier 940C series come to mind as a decent, cost-effective upgrade. The C-D caps were an effective yet inexpensive upgrade to the C.L.E.A.R. phono preamp I wrote about earlier this year. Though physically a bit larger than the stock caps, they would likely fit without much difficulty.
I’d say that the Pre1616D is not a kit for a first-time builder, unless someone with more experience is supervising. Many kit/DIY builds are compromised by poor soldering technique and rushed assembly. A slender, temperature-controlled soldering iron is essential. The Hako knock-off that I have works well and was only about 50 dollars. A multimeter is a near-essential as well. An expensive one isn’t necessary, though an auto-ranging type is preferred. Usually something satisfactory, costing between 20 and 40 dollars, can be found at hardware or automotive supply stores. Other than the soldering iron and multimeter, only basic tools are required. You will need to supply your own solder though. Tubes aren’t included in the $795 US price, but a half decent tube set will cost less than a hundred bucks. Victor can supply tubes if desired, and a package deal might be available.
Wrap Up:
I was pleasantly surprised at how good the Pre1616D sounds. I’m usually wary of vintage designs. Too often it’s vintage for its own sake, at the expense of decent sound. Not in this case. The SunValley SV-Pre1616D offers good performance for the asking price. The fact that it is amenable to owner customization is a plus.
Could this be the line stage for you? If you are DIY-curious but don’t want to (or can’t) do any metal working, this kit might be irresistible. If you take the plunge heed this warning: you’ll be scouring the web for other tubes to try.
Many thanks to Victor Kung at VK Music.
Steve: It’s nice to see some value-proposition hi-fi !
pj
Great review, and a great product as I completed the build a few months back with PSVANE 274B, and NOS RCA’s 12AX7, and rolling the 12AU7 on ITT’s and Tele’s. Caps are Mundorf Silver Gold. Victor is a great resource and true DIY-HIFI guy. Second build and order from him as I also built the TU-8600, very different as one is PCB and the SV-PRE is point-to-point and tight with the VCAPS. Enjoy and explore!!!
Hello Is the schematic for the 1616 available somewhere? Thanks
Hi,
This is a commercial product. If you have issues that need troubleshooting please contact Victor.
R B,
The amplification section of the 1616D is essentially the line stage section of the classic Marantz 7. The 7’s schematic can be found online. The SunValley’s filament supply is DC and employs solid state regulation. The B+ in the 1616D is tube rectified (SS optional) whereas the Marantz used solid state diodes.
Thanks for your interest in WOS.ca. Hope this helps.
Regards, Steve Graham